Pool was empty when we uncovered it this year.


Well that sucks but it looks nice now. Was it out of commission until recently or did you just get around to post now? Friends had liner issues and a crap ass pool company had their money and lots of promises and they were down for almost two years.Pool was empty when we uncovered it this year.


We opened it late. When I first saw it, I wondered if they had drained it too much the previous winter, but there was lots of snow on the cover, so it should have filled back up. The new liner came sooner than expected. If the pool guy had called on Friday instead of during lesson 4 on Saturday, it might be open now. We still need a leaky pipe beside the house cut out and replaced, but it's above the surface, so shouldn't be too much trouble.Well that sucks but it looks nice now. Was it out of commission until recently or did you just get around to post now? Friends had liner issues and a crap ass pool company had their money and lots of promises and they were down for almost two years.
I suppose you could have built a scenic little bridge over the root but the tree should heal.I found out why one section of my walk way was lifting. At about 6" inches across this was a major root. Hope cutting through it doesn't kill the tree. Any suggestion as to whether the cut end needs to be sealed in some fashion before it's covered with more concrete?
View attachment 62082View attachment 62083
Interested in seeing how it turns out. I’ll need a new project soon.Building an accent wall, doing crown and wainscotting in my bedroom.
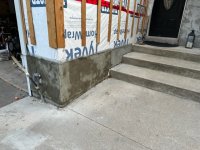
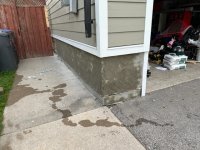
Forgot to mention the parging...super easy and I feel the hardest part is getting the right consistency in the mix...after that it's just a matter of patience and being careful with it.Interested in seeing how it turns out. I’ll need a new project soon.
I used this with no issue.What's a good material for concrete expansion joints. I think something like tentest but I only need two pieces about 5"x36"
Also I can pour directly on the ground? Do I really need a thin bed of gravel?

I like MP's product. Cheap and fit for purpose. Can you even buy tentest anymore?What's a good material for concrete expansion joints. I think something like tentest but I only need two pieces about 5"x36"
Also I can pour directly on the ground? Do I really need a thin bed of gravel?
We opened it late. When I first saw it, I wondered if they had drained it too much the previous winter, but there was lots of snow on the cover, so it should have filled back up. The new liner came sooner than expected. If the pool guy had called on Friday instead of during lesson 4 on Saturday, it might be open now. We still need a leaky pipe beside the house cut out and replaced, but it's above the surface, so shouldn't be too much trouble.
On the upside, water table is low at his house. Probably no need for a sump pump.Where did it all go? Any damage from the leak? That must have been a lot of water.
“Neighbour discovers new well that smells of chlorine”On the upside, water table is low at his house. Probably no need for a sump pump.
I like MP's product. Cheap and fit for purpose. Can you even buy tentest anymore?
As for gravel, at a previous office the sidewalk heaved less than 10 years after construction. When it was broken up, the 3" of gravel that was supposed to be there (and was signed off by the building inspector) was a single layer of stones. Pencil whipped inspection or outright corruption? What was under the concrete to begin with? Doing much better on the segment that is being replaced than the remainder of the walkway doesn't make a lot of sense to me.
Not sure on location/configuration, but now is the time to run a conduit under. No more wires/hoses across the walkway.
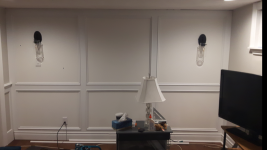
I'm using the work I did in my parents' basement as a guide. This pic was before I installed the crown. I'm just a basic DIY'er but I think it turned out alright and my parents were happyInterested in seeing how it turns out. I’ll need a new project soon.

Thanks. What product did you use and how would I go about making the mixture darker so it’s not so concrete looking?Forgot to mention the parging...super easy and I feel the hardest part is getting the right consistency in the mix...after that it's just a matter of patience and being careful with it.
I prefer using the smaller tools simply because being bent over low to the ground and the shoulders didn't like the heaviness of the bigger tools. Smaller took longer, but allowed me to be more precise.
Then while it's still drying take the larger trowel to even out the bumps/ridges.
I'm happy with my first attempt. May go for layer #2 tonight.
Looks great. Nail gun to attach to the wall or did you use adhesive also?I'm using the work I did in my parents' basement as a guide. This pic was before I installed the crown. I'm just a basic DIY'er but I think it turned out alright and my parents were happy
I did the rest of the basement in a similar style but only about 33" up from the floor
View attachment 62092
I’m using KING Masonbond 400. As for colour I’m not sure. Maybe have it thicker…but I’ll see how the second layer I did today dries up and show you tomorrow. You can also paint it or add a dye.Thanks. What product did you use and how would I go about making the mixture darker so it’s not so concrete looking?
Looks great. Nail gun to attach to the wall or did you use adhesive also?


Thanks. What product did you use and how would I go about making the mixture darker so it’s not so concrete looking?
Looks great. Nail gun to attach to the wall or did you use adhesive also?
Builders suppliers carry powdered pigments. I've never used them but hazard a guess matching colours will be a challenge as wet and dry will differ.Thanks. What product did you use and how would I go about making the mixture darker so it’s not so concrete looking?
Looks great. Nail gun to attach to the wall or did you use adhesive also?

