Yes. Negative to pin on flat 4 that is different. Positive to each of the other three to test each circuit. 12v battery or dumb charger/power supply works.Can I test them without connecting to the car?
You are using an out of date browser. It may not display this or other websites correctly.
You should upgrade or use an alternative browser.
You should upgrade or use an alternative browser.
What did you do in your garage today..?
- Thread starter Hack
- Start date
Sounds simple. Need some spare cables to jump it.Yes. Negative to pin on flat 4 that is different. Positive to each of the other three to test each circuit. 12v battery or dumb charger/power supply works.
EDIT: no dice. Not only that my cable from negative fell onto the positive on the battery LOL
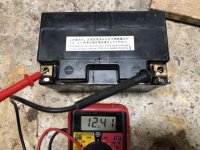
Sparks, fizz, and smoke…..but the battery is still showing 12V….FML

You can see the charting on the negative terminal. Time for a new battery?
Cable just slipped out of my hand.
Last edited:
Mad Mike
Well-known member
I could just build myself a sturdy (and heavy as hell) ramp of 2x4s and plywood. That would do the trick, but that would only work in the house as I wouldn't feel like carrying it up. Hell I could just lift the bike partially on my table and just drive off it onto the trailer.
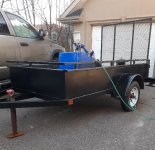
Is that a Robertson wood screw? If so, that's seasonal maintenance as the ground is relying on the surface cut by the threads.Removed the rotting plywood from the trailer, and drilled into the frame to ground it as per GTAM recommendation.
View attachment 54364
View attachment 54365
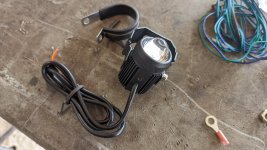
don’t flame the connectors that’s just to test the lights before a final connection.
Need to test it all tomorrow.
Can I test them without connecting to the car?
A couple of suggestions:
1) Keep the ground wire on the inside side of the frame, less likely to snag it.
2) I like to flow a little solder into a crimped eyelet connections -- helps protect against corrosion.
3) Use a nut, bolt, tooth washer and a little schmear of dielectric grease to fasten the ground wire. Sand a little paint off both sides, where you're making the connection, then paint over with Tremclad. This method should last a lifetime.
4) $10 bucks worth of split wire conduit protects your wiring from road debris and ice
Mad Mike
Well-known member
All you need is the meter, no battery required.Sounds simple. Need some spare cables to jump it.
EDIT: no dice. Not only that my cable from negative fell onto the positive on the battery LOL
Sparks, fizz, and smoke…..but the battery is still showing 12V….FML
View attachment 54366
You can see the charting on the negative terminal. Time for a new battery?
Cable just slipped out of my hand.
Put it on OHMS.
Measure Pin 4 (the female) to the hitch - 0 OHMs is a win!
Measure Pin 4 to pins 1, 2 and 3. 3 ohms is a win!
I think he put led lights on.All you need is the meter, no battery required.
Put it on OHMS.
Measure Pin 4 (the female) to the hitch - 0 OHMs is a win!
Measure Pin 4 to pins 1, 2 and 3. 3 ohms is a win!
Mad Mike
Well-known member
Wife is mad at me so I got lots done in the garage today.
1) Bodywork on the DT. Stripped the tanks and rear fender, planished out the crease left when the fender folded back after an endo wheelie, pulled and filled 45 years of dents.
2) Changed fork oil, polished front forks, new shoes, new gaiters (red!), and a new red UFO front fender.
3) Installed new swingarm bushings
4) Drilled out the rear brake lever bushing, welded in a tophat style bush I made last week.
5) Installed a futon beside my bike lift.
Mad Mike
Well-known member
I think most trailer kits have load resistors if they come with LEDs. If not, aren't the lights are gonna blink fast?I think he put led lights on.
My led trailer lights don't draw enough to make my old school flasher work. I have never bothered to hook them up to measure the resistance or draw. Something to do next time.I think most trailer kits have load resistors if they come with LEDs. If not, aren't the lights are gonna blink fast?
Trailer lights work! The issue appears to be the connector in the car as it’s not sending out a signal.
Meaning my issue is larger than I wanted.
Neighbour pulled up when he saw me frustrated and we connected the trailer to his car. All lights work.
Meaning my issue is larger than I wanted.
Neighbour pulled up when he saw me frustrated and we connected the trailer to his car. All lights work.
Trailer lights work! The issue appears to be the connector in the car as it’s not sending out a signal.
Meaning my issue is larger than I wanted.
Neighbour pulled up when he saw me frustrated and we connected the trailer to his car. All lights work.
General PDP Template
Might help.
Mad Mike
Well-known member
Sanded using a flapper disc, then touched up a bit by hand. Shot a little POR metal prep into the seams and bare metal on the front and ramp.Looks good @Mad Mike how did you prep and paint it?
Not really necessary but I had a bunch leftover from another project (it's awesome as a primer if you don't need high fill).
Shot with 5 parts Rustoleum semigloss rust paint, 3 parts naptha. Still kinda cold for most thinners.
Still have to do the floor and inside walls. im going to use rollon bedliner.
Nice thanks. Previous owner had a ton of duct tape on the trailer so I’m trying to figure out how to remove all the goo left over.
But I wouldn’t mind painting it over as it looks garbage in it’s current state.
But I wouldn’t mind painting it over as it looks garbage in it’s current state.
Relax
Well-known member
Trailer lights work! The issue appears to be the connector in the car as it’s not sending out a signal.
Meaning my issue is larger than I wanted.
Neighbour pulled up when he saw me frustrated and we connected the trailer to his car. All lights work.
Check the fuse in your vehicle. I was in your position when I got my trailer-in-a-bag and didn't think to check the SUV fuse because everything worked before with my other trailer. I was having bulb problems and there must have ben a short within the housing that blew the fuse.
Mad Mike
Well-known member
Use a 3m paint remover wheel in a drill, it takes stickers and goo off in an instant. It you have a cheapie grinder you can use a flapper disk.Nice thanks. Previous owner had a ton of duct tape on the trailer so I’m trying to figure out how to remove all the goo left over.
But I wouldn’t mind painting it over as it looks garbage in it’s current state.
I like Armourcoat rust paint, it's cheep and tougher than Tremclad. My bro uses it on all his farm gear. You can roll and tip or spray for a nice finish as it's oil based.


