Send pictures....So..... I've opened up my bike. It started by replacing the broken fairing and adding a USB charger through the front. It made me realize the previous owner(s) once opened up the bike and did a bad job closing it. One thing led to another and I ended up stripping down all fairings and almost 60% of the parts and attachments and then ordering a full set of nuts and bolts and those plastic rivets and fixing them up.
It's all done.... except.... for the love of God.... I'm unable to fix the grab rail which is a pre-requisite for fixing the seat. Help?!
You are using an out of date browser. It may not display this or other websites correctly.
You should upgrade or use an alternative browser.
You should upgrade or use an alternative browser.
What did you do in your garage today..?
- Thread starter Hack
- Start date
Send pictures....
+1
Prerequisite for posting in this thread is to attach some WrenchPorn.
The more wrenchier, the better!
hymnz
Well-known member
Send pictures....
Prerequisite for posting in this thread is to attach some WrenchPorn.
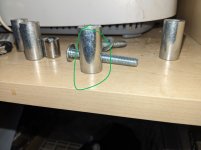
This separator/spacer ..

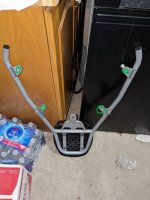
goes below these 4 holes..

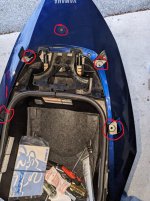
and the entire setup sits in these 4 holes on the frame..

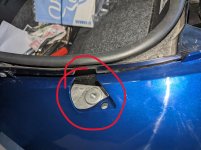
The problem I'm having is the gap between the fairing and the hole on the frame is so wide...

...that the spacers keep slipping into the gap and I have to open up the side fairings faring completely to get the spacers out. Any tips/tricks?
Options:This separator/spacer ..
View attachment 65879
goes below these 4 holes..
View attachment 65880
and the entire setup sits in these 4 holes on the frame..
View attachment 65881
The problem I'm having is the gap between the fairing and the hole on the frame is so wide...
View attachment 65882
...that the spacers keep slipping into the gap and I have to open up the side fairings faring completely to get the spacers out. Any tips/tricks?
Use bolts to hold spacers in place
Use superglue to hold spacers on pads.
Use grease to hold spacers in place (either on pads or around bolts).
Lay bike over on something soft to change the direction gravity is working in the process.
Assemble the spacers and the bolts and rack as they should be. Once the bolts are poking out through the spacer take some electrical tape or even painters tape and slide it onto the bolt.
The tape should hold the spacer in place as you are trying to line up the bolts with the screws.
You might needs to slice the tape jus to get the tape onto the bolt.
Thread the bolts in a few (2-3) threads and using some needle nose pliers rip the tape out from under the spacer.
You might find that it might be easier to do once side at a time.
Having said that, the bolts should be long enough that if you thread it in a few thread, you should still be able to work with the remaining spacers and bolts.
Good recommendations above.
Also, are you working with the bike on the side stand or is the bike level somehow (centerstand or jack)?
Obviously sidestand is going to make the job a lot harder because of the lean angle and gravity. If so, can you level the bike out somehow so the spacers don't slide out?
Also, are you working with the bike on the side stand or is the bike level somehow (centerstand or jack)?
Obviously sidestand is going to make the job a lot harder because of the lean angle and gravity. If so, can you level the bike out somehow so the spacers don't slide out?
hymnz
Well-known member
I haven't tried this. I'll give it a try after trying with the tape. I tried with superglue yesterday, but they didn't stick enough.Use bolts to hold spacers in place
That's the plan for today.The tape should hold the spacer in place as you are trying to line up the bolts with the screws.
It's on the center stand.is the bike level somehow
This separator/spacer ..
goes below these 4 holes..
and the entire setup sits in these 4 holes on the frame..
The problem I'm having is the gap between the fairing and the hole on the frame is so wide...
...that the spacers keep slipping into the gap and I have to open up the side fairings faring completely to get the spacers out. Any tips/tricks?
I always use grease. Works most of the time, but alternatively, I have a can of belt dressing I keep for things like this. It's sticky. It also is a good protector for battery terminals and bare spots where you want to prevent rust. I've had the same can in my garage for over 20 years. I use it rarely, but it never seems to run out, plug up, or run out of compression. It's weird, but good-weird. lol
Is the problem that the railing is too big/unwieldy and you need a separate pair of hands? Seems there is enough space for you to slide the spacer in from the side and slide the bolt through from the top?
Do you need one person holding the railing, while you slide the spacer in with one hand and screw the bolt in with your other? Then repeat for the other three?
Do you need one person holding the railing, while you slide the spacer in with one hand and screw the bolt in with your other? Then repeat for the other three?
hymnz
Well-known member
No. That's not it. I think it's just a weird angle. The space is too cramped. All the railings for Tmax I've seen come with the railing having those spacers welded into it.Is the problem that the railing is too big/unwieldy and you need a separate pair of hands? Seems there is enough space for you to slide the spacer in from the side.
Do you need one person holding the railing, while you slide the spacer in with one hand and screw the bolt in with your other? Then repeat for the other three?
I observed the area around the holes a little closer today and I can see some white stuff here and there. I'm guessing the previous owner who fixed this also used some sort of glue to hold the spacers in place. Last time I used glue I was impatient and tried to fix it within an hour. I'll be more patient this time.
Mad Mike
Well-known member
I do this with the spaces on my atv racks (same problem). You need 4 drinking straws. Slit them lengthwise if they are too fat.This separator/spacer ..
View attachment 65879
goes below these 4 holes..
View attachment 65880
and the entire setup sits in these 4 holes on the frame..
View attachment 65881
The problem I'm having is the gap between the fairing and the hole on the frame is so wide...
View attachment 65882
...that the spacers keep slipping into the gap and I have to open up the side fairings faring completely to get the spacers out. Any tips/tricks?
1. Insery a plastic drinking straw through the spanner bushing and the bold holes, drop the rack over the straws.
2. Apply pressure to the rack, gently pull the only the straw the straw you are working on, drop in the first bolt. Repeat.
Another option is a dab of hot melt glue.
I'm gonna miss single use plastics......1. Insery a plastic drinking straw through the spanner bushing and the bold holes, drop the rack over the straws.
I'm gonna miss single use plastics......
I think those are called fairings if you don't have crash bars on your ADV bike.
How did you know that they had straws? Lol@Mad Mike you're a genius
It's an astounding success!! 4 straws from Timmies!! Who knew my first ever visit to Timmies would grant me this much joy!!
Congrats on the fix.
You must be thinking of a bmw. KLR bits take a licking and keep on ticking.I think those are called fairings if you don't have crash bars on your ADV bike.
You must be thinking of a bmw. KLR bits take a licking and keep on ticking.
Well, that's because KLRs come from the factory looking like they've already been crash-damaged.


