Enough of COVID...what are you doing to the house?

You could throw a new bearing on and reuse the shaft

Sent from the future
I’m just pulling the armature (?) from one saw and swapping it out. Don’t have anything to pull the bearing, or reinstall it for that matter.

Might keep it for fun and learn on it. Same as for the housing where the bits of the bearing are.
 
What's in the PA box.
 
I don't have any plumbing experience other than laying pipe (tip your waitress folks, I'll be here all week). Any tips or products recommended for hooking up a double kitchen sink? I've got a kitchen place installing cabinets/counters/sink at my inlaws but I don't know if they'll actually be hooking up the sink drain so I'm preparing for that if need be (island sink so it drains down into floor and I'll be removing the current kitchen as well so I'll potentially have to cut that pipe to remove/install island).
 
If they don’t hook up , any big box store will have a double sink hookup up kit , it’s all sleeve joints and compression fittings . A plumber will cut fit and glue , but that’s because they have all that in the truck, and costs less ( for them) . Take the easy way out and buy the kit.
Water runs downhill , don’t lick your fingers .


Sent from my iPhone using GTAMotorcycle.com
I remember when I left the car dealership life and went into water and wastewater my GM said similar words to me...

'remember...poop always flows downhill. How hard can it be?'

Interesting industry, but after 3 years I moved on to what I do now. Love it for the most part, but I'd need to go back to private to get a big pay bump.
 
If they don’t hook up , any big box store will have a double sink hookup up kit , it’s all sleeve joints and compression fittings . A plumber will cut fit and glue , but that’s because they have all that in the truck, and costs less ( for them) . Take the easy way out and buy the kit.
Water runs downhill , don’t lick your fingers .


Sent from my iPhone using GTAMotorcycle.com
The tricky part with an island sink is venting. Screw that up and it all goes wrong. On the upside, many have come before. Not too hard to find schematics on best practice. Slightly harder but normally possible to find info on code compliance in Ontario.
 
I’m just pulling the armature (?) from one saw and swapping it out. Don’t have anything to pull the bearing, or reinstall it for that matter.

Might keep it for fun and learn on it. Same as for the housing where the bits of the bearing are.
If you have it out, it's worth replacing the bearings, cleaning the commutator, and renewing brushes. Not much else wears in an electric motor.

$15 for a small bearing puller, another $20 for the brushes and bearings.
 
If you have it out, it's worth replacing the bearings, cleaning the commutator, and renewing brushes. Not much else wears in an electric motor.

$15 for a small bearing puller, another $20 for the brushes and bearings.
If he's careful, he could avoid the puller. Dremel cut the race wouldnt take long. Puller is easier but if he really wanted to avoid the tool its possible (especially easy now that is just a race. Also heat plus vise grips plus hammer should get it off with a little struggle.
 
If you have it out, it's worth replacing the bearings, cleaning the commutator, and renewing brushes. Not much else wears in an electric motor.

$15 for a small bearing puller, another $20 for the brushes and bearings.
I'll keep the part, and the bearing from Bosch is very cheap.

Pulling it off will be the hardest part, and then putting it back on.

First thing's first...I need to get the new one into the saw and having stupid issues aligning the frame as it's free wheeling on me and I can't get the screws back into it.
 
I don't have any plumbing experience other than laying pipe (tip your waitress folks, I'll be here all week). Any tips or products recommended for hooking up a double kitchen sink? I've got a kitchen place installing cabinets/counters/sink at my inlaws but I don't know if they'll actually be hooking up the sink drain so I'm preparing for that if need be (island sink so it drains down into floor and I'll be removing the current kitchen as well so I'll potentially have to cut that pipe to remove/install island).
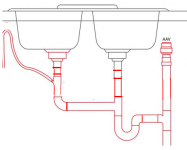
You can buy a double sink connection that includes everything wo connect 2 sinks and a dishwasher - OR make one from ABS parts.

1701698017524.png
You need more as you must plumb in a vent, trap, (optional dishwasher) and connect to the 1-1/2" ABS drain running thru th e floor.

1701700452039.png

Bill of materials (mumbers in brackets are if you buy the kit)


All plumbing should be 1.5" ABS
6' ABS (4')
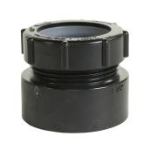
2x ABS straine rconnectors (0), connects to sink strainer downspouts
1701700501144.png

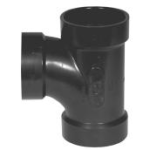
2x sanitary tee (1), one connects the 2 downspouts to the drain line, the other connects to the vent line. OPTIONAL Dishwasher hookup tee.
1701698497239.png

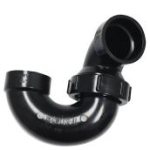
1 Trap (suggest using a union type with ball connection - best for novice plumbers)
1701698222562.png
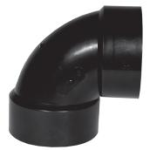
2x 90 degree elbows (1) to connect trap to main line and connect cross pipe

1701700527494.png
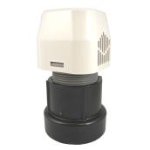
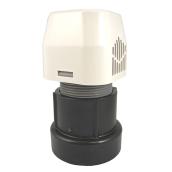
1x Air admittance valve (this allows air into the drain when water is leaving.
1701698867464.png

Small bottle of ABS cement.
 
I'll keep the part, and the bearing from Bosch is very cheap.

Pulling it off will be the hardest part, and then putting it back on.

First thing's first...I need to get the new one into the saw and having stupid issues aligning the frame as it's free wheeling on me and I can't get the screws back into it.
If you're trying to reassemble the cases and the long bolts are moving everywhere, here's a tip.

Cut a length of coat hanger wire (or any stiff wire that's thinner than the bolt threads) that's a few inches longer than the bolts. Put the wire thru one end plate, then drop the other end over the wire. It will lock the plates in close enough alignment that you can thread in one long bolt. Yank the wire and thread in the other long bolt.
 
You can buy a double sink connection that includes everything wo connect 2 sinks and a dishwasher - OR make one from ABS parts.

View attachment 64702
You need more as you must plumb in a vent, trap, (optional dishwasher) and connect to the 1-1/2" ABS drain running thru th e floor.

View attachment 64707

Bill of materials (mumbers in brackets are if you buy the kit)


All plumbing should be 1.5" ABS
6' ABS (4')
2x ABS straine rconnectors (0), connects to sink strainer downspouts
View attachment 64708

2x sanitary tee (1), one connects the 2 downspouts to the drain line, the other connects to the vent line. OPTIONAL Dishwasher hookup tee.
View attachment 64704

1 Trap (suggest using a union type with ball connection - best for novice plumbers)
View attachment 64703
2x 90 degree elbows (1) to connect trap to main line and connect cross pipe

View attachment 64709
1x Air admittance valve (this allows air into the drain when water is leaving.
View attachment 64705

Small bottle of ABS cement.
Talk about timing, I've got to do something like this in the new year. Just adding the AAV to the laundry sink. Where did you get the photo from? Curious what other info might be there on this kind of setup.
 
demo.jpg

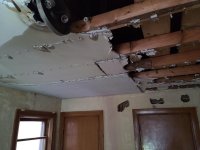
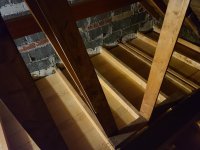
I removed the ceiling in the area below where the loft is going. Two layers of rocklath and plaster, I really hate removing this stuff (heavy and tough, including wire mesh on the seams). Luckily when they put the second layer on they did not glue it to the first (I would have) so I was able to take it down one layer at a time. The ceiling must have been sagging bad (weight) at some point. Someone "fixed" this by cutting some of the 2X4 joists half way through, jacked up the ceiling and then hung 1X boards from the rafters down to the cut 2X4s to hold them up..... pic of this top notch engineering from the top before removal....

20231117_170150.jpg

150 sq.ft of ceiling, just the rocklath and plaster, nothing else----just shy of 2,000 lbs at the dump. The insulation I removed went into another attic space and the 2X4 joists will be repurposed so neither went to the dump.

Starting the reframing next, 2X8 joists with a LVL beam to make this a useable floor.
 
Talk about timing, I've got to do something like this in the new year. Just adding the AAV to the laundry sink. Where did you get the photo from?
IPEX DWV 1.5-in ABS Air Admittance Valve
Curious what other info might be there on this kind of setup.
Venting is always a challenge in renos. There are two options, AAV or a vent loop. AAVs are between $5 and 35 depending on what you want. I have found the $6 valves to work fine if you can get it well above (8") the fill level of your sink. For an island install, I'd buy the better $30 valves that close tight under positive pressure, that's cheap insurance.

The vent loop is trickier as you have to find an existing vent and a route to it, and you must make sure there are no other vents in the stack above the fill line in the sink.

I would consult a plumber if you want to tie into an existing vent stack and you're not on the top floor.
 
View attachment 64710

I removed the ceiling in the area below where the loft is going. Two layers of rocklath and plaster, I really hate removing this stuff (heavy and tough, including wire mesh on the seams). Luckily when they put the second layer on they did not glue it to the first (I would have) so I was able to take it down one layer at a time. The ceiling must have been sagging bad (weight) at some point. Someone "fixed" this by cutting some of the 2X4 joists half way through, jacked up the ceiling and then hung 1X boards from the rafters down to the cut 2X4s to hold them up..... pic of this top notch engineering from the top before removal....

View attachment 64711

150 sq.ft of ceiling, just the rocklath and plaster, nothing else----just shy of 2,000 lbs at the dump. The insulation I removed went into another attic space and the 2X4 joists will be repurposed so neither went to the dump.

Starting the reframing next, 2X8 joists with a LVL beam to make this a useable floor.
Tip: Remove ceilings from above if you can. Place a 2x4' section of 5/8 plywood across the rafters, stand on the plywood then use your boot to stomp out the ceiling.

That way no dust or asbestos gets in your beer.
 
View attachment 64710

Starting the reframing next, 2X8 joists with a LVL beam to make this a useable floor.
What are the dimensions of the room? 150sq' can't be any wider than 12' 4" in the narrow run -- no LVL required.

2x8 floor joists will span 12'7" 16OC.
 
IPEX DWV 1.5-in ABS Air Admittance Valve

Venting is always a challenge in renos. There are two options, AAV or a vent loop. AAVs are between $5 and 35 depending on what you want. I have found the $6 valves to work fine if you can get it well above (8") the fill level of your sink. For an island install, I'd buy the better $30 valves that close tight under positive pressure, that's cheap insurance.

The vent loop is trickier as you have to find an existing vent and a route to it, and you must make sure there are no other vents in the stack above the fill line in the sink.

I would consult a plumber if you want to tie into an existing vent stack and you're not on the top floor.
On that front, I may add a garage sink. Aside from losing some space, venting is the biggest issue and AAV is much simpler than trying to tie into an existing stack (closest actual vent is inaccessible without huge destruction, a main drain stack isn't too bad to access). @48Connor how did you deal with venting for your garage sink?
 
Tip: Remove ceilings from above if you can. Place a 2x4' section of 5/8 plywood across the rafters, stand on the plywood then use your boot to stomp out the ceiling.

That way no dust or asbestos gets in your beer.
Two full layers of rocklath and plaster, good luck with that. Nevermind the weight of the chunks coming down with two layers. I did try stomping on it first, way too much force was needed and repeated blows.

One layer of rocklath that does work (and regular drywall) and it is pretty much how I got the top layer down after the first was down (just used a large hammer instead to save my feet and to keep the size/weight of the falling chunks down).

The bottom layer I used a pry bar from below and some of the chunks that came down were well above 50 lbs each.
 

Back
Top Bottom