Relax
Well-known member
Or come out with us on Thursday night (I hear tomorrow is a go) and you won't even notice the wind because you'll be having too much fun on the 60-80 km/h back roads and twisties.
I’m gonna be honest it felt good to play around with it.Looks awesome!
At this point may as well hang onto the bike for another 2 years or so and enjoy it.
I’ll see if I can make it out. But still worried I’m the slow poke!Or come out with us on Thursday night (I hear tomorrow is a go) and you won't even notice the wind because you'll be having too much fun on the 60-80 km/h back roads and twisties.
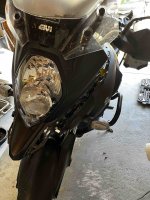
How many Kms on the bike so far...... I want to feel inadequate.Found out my headlight wasn't working on a ride back home the other day. Used hi beams. Take that drivers!
The bulb seemed to be a standard H7 automotive bulb, picked 1 up from CT.
Now the fun part. You have to take apart a lot of the bike just to get to the bulb.....
View attachment 69580
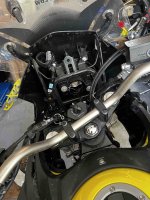
So the dash has to be removed, plus some side bits.
View attachment 69581
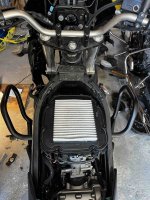
Since I was this far, I also had to replace the spark plugs. More stuff to take off. Mainly the gas tank.
View attachment 69582
Air filter looks ok too. The front plug was a ***** to get at since the rad is in the way. Finally got it though, with the use of the bendy socket adapter.. Whew.
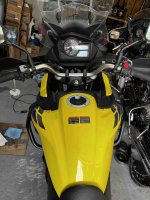
Back together, its starts!
View attachment 69583
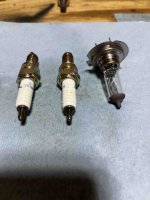
All that for these 3 parts!
View attachment 69584
I must have hit a serious bump to break the thing in the bulb. Might go LED if I can figure that out.
I guess it wasn't that bad to remove the fairing etc, now that I have done it. Lots of cheapy plastic bits, was happy I didn't break any of it and it went back together well enough. Those plastic push clips are interesting.
Just over 14,000.How many Kms on the bike so far...... I want to feel inadequate.
Nice.... I have this week off (other than Tuesday) if you want a riding partner for a day.Just over 14,000.
Oh nice, should be a good week.Nice.... I have this week off (other than Tuesday) if you want a riding partner for a day.

 www.gtamotorcycle.com


Wow nice work, I wasn't expecting it to look so finished at the end.I found out my rear top case rack will be delayed and might not come by in time for an upcoming trip. I decided to make a temporary rack for a duffle bag out of 1/2" plywood. The idea was to keep it simple and lightweight.
Passenger seat removed and test fit the brackets.

Top plate mounts on the brackets via two slots to prevent any movement.

Top plate shaped with some holes cut for strap anchor points. Also took a router to the edges. The idea is that the straps that hold the bag down will also keep the top plate in place.

Painted

Test run with camera mounted to monitor any movements with the top plate.

I'm using Rok straps to hold down the bag. In the end, some large bumps knocked the top plate out of the slots. I was thinking that might happen so I added some additional straps to hold down the top plate which seemed to have solved the problem. Hope this set up holds up for a 3 day trip.
Seriously - I could use a live edge 6 seater dining table!Wow nice work, I wasn't expecting it to look so finished at the end.
I think you found a nice side hustle
Put tightbond III on both faces and then clamp and it will never come apart. You have a lot of surface area. The straps are probably fine but I expect the loose plate may move a bit and make noise (especially if you are going somewhere with lower humidity) which would be disconcerting.Thanks guys!
@oioioi - The original plan was to make it so that the top plate bolts to the brackets but then I would have to add more pieces of wood, introduce more connections/joints which have potential to fail. My thought was, with straps holding the top plate to the bracket, there are less things that can break and can be fixed/adjusted without tools. Hard to see but the top plate also rests on the stock passenger rear handle so the weight isn't completely on the brackets.
@mimico_polak - I'm located in Stouffville. Will be happy to help anyway I could. Send me a message.
If you want the top plate to be easily removable, you could have two small forward-facing pins or flat plates attached to the front of the uprights, which hook over the front edge of the slots in the plate. Combine those with some sort of attachment mechanism to the rear tubular steel bar to keep the whole thing from lifting off. The rear attachment could be something like a hinged metal strap (attached to the top plate, and positioned to close itself around the bar), a threaded insert in the top plate, and a hand-knob/bolt through the hinged strap.Thanks guys!
@oioioi - The original plan was to make it so that the top plate bolts to the brackets but then I would have to add more pieces of wood, introduce more connections/joints which have potential to fail. My thought was, with straps holding the top plate to the bracket, there are less things that can break and can be fixed/adjusted without tools. Hard to see but the top plate also rests on the stock passenger rear handle so the weight isn't completely on the brackets.
@mimico_polak - I'm located in Stouffville. Will be happy to help anyway I could. Send me a message.
That is version 2, or the deluxe upgraded model.If you want the top plate to be easily removable, you could have two small forward-facing pins or flat plates attached to the front of the uprights, which hook over the front edge of the slots in the plate. Combine those with some sort of attachment mechanism to the rear tubular steel bar to keep the whole thing from lifting off. The rear attachment could be something like a hinged metal strap (attached to the top plate, and positioned to close itself around the bar), a threaded insert in the top plate, and a hand-knob/bolt through the hinged strap.

