So it's that time again....winter pasttimes?

Might be a stupid question but do you buy them already studded? They look like an off the shelf unit so I’m assuming so.

Not a stupid question at all. I had the same questions when I first looked into it.

You can get them pre-studded, but the drawback is that they are very expensive (I'm no baller) and you don't get to choose the kind of stud (length, material and brand) to use, as well as customizing the stud pattern, depending on if you want more grip on the edges, less in the centre, more rear grip vs more front grip, etc.

All of those choices depends on the kind of riding you're going to do, terrain, skill level, etc.

With pre-studded tires, every single lug is studded - which is not necessarily a good thing. I ended up opting for more rear grip over front, so less studs in the front.

IIRC, I put in around 300 studs for each rear, and 200 studs for each front. For four tires, it took about 4 hours total over 3 days sitting in front of the TV drilling each stud in one at a time:


My back was killing me after I was done.

My dad used to install machine screws into the knobbies of his ice racing tires by hand. No electric screwdrivers back then to make it easy. I used to sit and watch fascinated.
 
My dad used to install machine screws into the knobbies of his ice racing tires by hand. No electric screwdrivers back then to make it easy. I used to sit and watch fascinated.
I use sheet metal screws for my wife's winter runners. They don't last long but really help with traction.
 
I use sheet metal screws for my wife's winter runners. They don't last long but really help with traction.

Yeah, there's also an element of environmental consideration with the type of studs you use.

The more expensive studs have a wider auger-type thread that stay in the lugs better. You're not replacing them as often as cheaper screws that fall out every ride. But also, those cheap screws stay on the trails when the snow melts and causes punctures on the dirt bikes and ATVs during knobby season.

Didn't lose one stud last season.

DSC_2013-XL.jpg
 
My dad used to install machine screws into the knobbies of his ice racing tires by hand. No electric screwdrivers back then to make it easy. I used to sit and watch fascinated.
Haven't iced for a couple of years (my kid's room mate left his ice bike with me 3 years ago, still fun).

Ive done lots of tires, never drilled. Just used a nut driver on a drill and sheet metal screws.

I don't like predrilling. Doubles install time, and I find it causes a lot more spitting, particularly on the middle knobs of back tires.
 
Not a stupid question at all. I had the same questions when I first looked into it.

You can get them pre-studded, but the drawback is that they are very expensive (I'm no baller) and you don't get to choose the kind of stud (length, material and brand) to use, as well as customizing the stud pattern, depending on if you want more grip on the edges, less in the centre, more rear grip vs more front grip, etc.

All of those choices depends on the kind of riding you're going to do, terrain, skill level, etc.

With pre-studded tires, every single lug is studded - which is not necessarily a good thing. I ended up opting for more rear grip over front, so less studs in the front.

IIRC, I put in around 300 studs for each rear, and 200 studs for each front. For four tires, it took about 4 hours total over 3 days sitting in front of the TV drilling each stud in one at a time:


My back was killing me after I was done.

Lol I heard on here somewhere that you were one of the ballers

You did a great job because they look like they were off the shelf


Sent from my iPhone using GTAMotorcycle.com mobile app
 
Couple winters ago a separated friend needed a distraction so we started a pepper mill business . We spent many weekends teaching him to use a lathe and a milling machine , made about 25 mills and gifted all but one . We may go back at that this winter since all the machinery is just sitting , it’s fun to produce something useful.


Sent from my iPhone using GTAMotorcycle.com
I helped make a paddle machine at one point. A terrifying beast that was. Cutterhead was a cylinder about 5" diameter and 10" tall covered in 0.75" diameter sharpened discs. That made it easy for the operator to spin cutters to a sharp side. Discs only needed to be removed and sharpened/replaced once entire perimeter was dull. It copied a template onto a wooden blank and cranked out a paddle every few minutes.
 
I’ve always wondered how “batch” paddles got made , sitting for hours with a spoke shave could be rewarding, but tedious. I assumed some deadly never CSA certified wood chipper was the route .


Sent from my iPhone using GTAMotorcycle.com
 
Fired up the Gran Turismo 7 after a full summer of not touching it. Hate the dirt racing as I can’t get my head around it so dusting off cobwebs…

IMG_1417.jpeg
 
This winter will be car building. Finished the mechanical freshening on the 55 year old Spitfire. Needs door skins, trunk rust repair, and body rubbers. Not essential, bu I want to replace the the wiring harness update the dashboard with modern switches and radio (with Android Auto).

This one’s for the wife. Next year maybe a restomod for me, lovin the idea of a 300hp CTS 6 speed lump in a 1500lb 2 seater roadster.
 
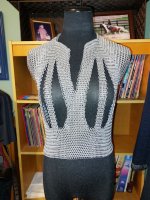
Looks like I'll be making a hat for an actor friend who punched Cary Elwes (if you've seen "A Bit of Bad Luck" he's the guy wearing the utili-kilt) and an Aviator Cap for the author friend who killed me off in his dieselpunk novel series "Airship Daedalus." That's in addition to the chainmail "crop top" I posted about, a while back. Pity it won't be going to the person I was hoping for. She would have looked great in it.

20231008_165117.jpg

I'm going to be busy for the next couple of months.
 
Last edited:
Was about to pick up a hydraulic small work table…but in a SHOCKING twist of events dad already had one so I got it.

Will be swapping the insides from two different saws.
 
A buddy offered to store my ice bike at his house and provide trailer space to go from there to Rice Lake. Hard not to say yes.....
 
Looks like I'll be making a hat for an actor friend who punched Cary Elwes (if you've seen "A Bit of Bad Luck" he's the guy wearing the utili-kilt) and an Aviator Cap for the author friend who killed me off in his dieselpunk novel series "Airship Daedalus." That's in addition to the chainmail "crop top" I posted about, a while back. Pity it won't be going to the person I was hoping for. She would have looked great in it.

View attachment 64059

I'm going to be busy for the next couple of months.
I was going to ask if you have a video outlining the process of this piece of art.
But I found this on YT.

Is this how you do it?


I was going to ask if you have a video outlining the process of this piece of art.
But I found this on YT.

Is this how you do it?


Most of the chainmail that I make is just butted rings (not fastened closed), though I do have a resistance welder and made a shirt for myself in welded stainless steel. Traditional drifting and riveting isn't something that I could do, without having a proper shop. The partially completed shirt that I posted a picture of is butted 1/4", 16 gauge aluminum rings and is costume grade. My personal shirt would stop a knife. Maybe these videos that I made will help explain?


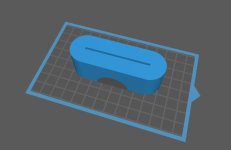
Finally looking into making an improved chainmail ring cutter and using my resin 3D printer to do it. Some version of this is going to be an inserted into a 1" think block of HDPE to make the base of the cutter. The jeweller's saw blade's chuck goes in through the side and the blade protrudes slightly through the slot at the top. Hoping to incorporate a cutting oil/water feed system to cool the blade, which will attach to the bottom of this piece. If I ever decide to improve it further in order to handle metals like steel and titanium, I can then give the 3D file to a machinist to produce it in billet aluminum.

Cutting_Block1.jpgCutting_Block2.jpg
 
Finally looking into making an improved chainmail ring cutter and using my resin 3D printer to do it. Some version of this is going to be an inserted into a 1" think block of HDPE to make the base of the cutter. The jeweller's saw blade's chuck goes in through the side and the blade protrudes slightly through the slot at the top. Hoping to incorporate a cutting oil/water feed system to cool the blade, which will attach to the bottom of this piece. If I ever decide to improve it further in order to handle metals like steel and titanium, I can then give the 3D file to a machinist to produce it in billet aluminum.

View attachment 65231View attachment 65232
That looks light a nightmare to machine using conventional tooling (probably easier to make as left/right and then attach together). Luckily, at least one gtamer seems to have access to a wire Edm that could bang it out easily. If I have the operation right in my head, hardened tool steel would be a better choice than aluminum as the saw will open up the slot in the aluminum.
 
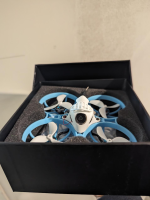
Getting into these little things

Originally for the kids but my daughter was too young for FPV drones back when i first researched it. 2-3 years ago.

Now she might be able to actually put in the work to get better at it. She's always had trouble at "putting effort to get better" because she's naturally talented at a lot of things...but like her dad, only at getting "good" at something, not getting great. Both the kids have been hounding me about them.

These little things require lots of hours of practice before being able to do confident, repeatable turns even so we'll see how it goes. I keep repeating "before you do a good 10-15 hours of practice it's not gonna be obvious to control" but it's not sticking yet...lol.

Getting her (and myself ) to put in some time of the simulators and then doing some indoor flying, gotta say, the season is perfect to limit activity to inside, otherwise we'd be too tempted to take it outside where so many things can go wrong.

EDIT)
picture since the video wont work
1703987255642.png
 
Last edited:

Back
Top Bottom