You are using an out of date browser. It may not display this or other websites correctly.
You should upgrade or use an alternative browser.
You should upgrade or use an alternative browser.
Enough of COVID...what are you doing to the house?
- Thread starter mimico_polak
- Start date
But why? I do like the handle. Pretty fancy.Does making a hand cranked paper shredder qualify as working on the house?View attachment 46869
EDIT:
Did you braze it? Old school cool.
Last edited:
Exercise!But why? I do like the handle. Pretty fancy.
Standing seam or exposed fastener? For you, probably no difference, for the next guy, ooof.'Having a new roof done... 'Went with steel this time as I'm hoping it'll be the last roof I ever buy.
Well... I'm not actually "doing" it, but rather a highly skilled and seemingly immune to the cold crew of guys are.
Hack
Well-known member
'Not standing seam and no exposed fasteners so... I dunno... Lol.Standing seam or exposed fastener? For you, probably no difference, for the next guy, ooof.
Looks pretty and will out last me so... Yippee!
No I’m confused.....I’ve got the same brick pattern around the garage where I’m 100% is block wall on the other side as I took off everything and we did it from the block.
On the inside you will see the block unless the house is closer to the Victorian era, then all brick. Those sideways bricks should be seen on the inside (only those ones). Given your brick colour they may not have contrasted with the block like red brick does (so it may not have jumped out at you at the time). Like in my one pick (below).... I can really see yours just blending in on the inside unless you really look for them.
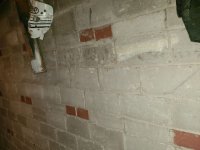
On the outside the "sideways" bricks are every 6th row. On the inside there is three rows of block and then a brick size course of block with the sideways bricks tying the two layers together. For yours, the likely just did not contrast much so you did not notice them. In fact, if the house has two or more floors (original not added on later) and the upper floors have wood siding (or stucco), if you peel the siding off you will find block on both inside and outside layers as the outside is not seen.
Older homes (and buildings) were truly solid brick with two or many more layers. My guess is once we got closer to the 30s (maybe even 20s) block was cheaper so the brick was just used on the outside.
****
For everyone, again.... be careful over insulating as it changes the "dew point" of the brick and can damage the outer layers over time. How much insulation and how porous the brick will determine how bad it is.
Ours is sand / lime brick, about the softest around. We insulated inside 30+ years ago but didn't go super insulated. Also super insulating usually goes with super sealing and that introduces the need for air exchange modifications.On the inside you will see the block unless the house is closer to the Victorian era, then all brick. Those sideways bricks should be seen on the inside (only those ones). Given your brick colour they may not have contrasted with the block like red brick does (so it may not have jumped out at you at the time). Like in my one pick (below).... I can really see yours just blending in on the inside unless you really look for them.
View attachment 46894
On the outside the "sideways" bricks are every 6th row. On the inside there is three rows of block and then a brick size course of block with the sideways bricks tying the two layers together. For yours, the likely just did not contrast much so you did not notice them. In fact, if the house has two or more floors (original not added on later) and the upper floors have wood siding (or stucco), if you peel the siding off you will find block on both inside and outside layers as the outside is not seen.
Older homes (and buildings) were truly solid brick with two or many more layers. My guess is once we got closer to the 30s (maybe even 20s) block was cheaper so the brick was just used on the outside.
****
For everyone, again.... be careful over insulating as it changes the "dew point" of the brick and can damage the outer layers over time. How much insulation and how porous the brick will determine how bad it is.
Redid the kitchen.
New countertop, tap and sink.
New window
Built a bank of drawers into the space were we removed the dishwasher we never used
Painted the cupboards and new hardware. (a solid old school Hanover kitchen - no need to replace)
New tiled black splash
New LED lights.
Fresh paint for the walls.
Grand total $3200**- it's easy if you don't have to have natural stone c/t, new cupboards and do all the labour yourself.
** doesn't include the curved drawer front I need to have made after covid or a new stove as ours now looks way too small
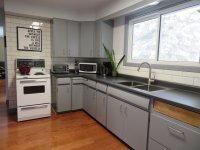
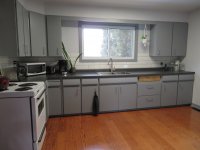


Last edited:
Pics or it didn’t happen!Redid the kitchen.
New countertop, tap and sink.
Built a bank of drawers into the space were we removed the dishwasher we never used
Painted the cupboards and new hardware. (a solid old school Hanover kitchen - no need to replace)
New tiled black splash
New LED lights.
Fresh paint for the walls.
Grand total $3200 - it's easy if you don't have to have natural stone c/t, new cupboards and do all the labour yourself.
Coil stove! Oh the horrors. Kids these days would lose their crap at that. Nevermind that the damn thing works with very few issues for decades. I prefer coils to flat top for so many reasons (unless you want to spring for induction, then I am ok with flattop).Redid the kitchen.
New countertop, tap and sink.
New window
Built a bank of drawers into the space were we removed the dishwasher we never used
Painted the cupboards and new hardware. (a solid old school Hanover kitchen - no need to replace)
New tiled black splash
New LED lights.
Fresh paint for the walls.
Grand total $3200**- it's easy if you don't have to have natural stone c/t, new cupboards and do all the labour yourself.
** doesn't include the curved drawer front I need to have made after covid or a new stove as ours now looks way too small
View attachment 46963View attachment 46964
The stove. My real estate agents bought us that stove back when you could squeeze them some. It's 30 years old. I've replace an oven element or two. However now that my wife is into baking more (thanks covid) she'd like one with better temperature controls, ours runs hot.
I'm perfectly fine with a new stove but I told her if we do we should expect to buy one about every ten years because no way a new stove is going to last 3 decades. As for a flat top - she thinks it will be easier to clean but I've heard different.
I'm perfectly fine with a new stove but I told her if we do we should expect to buy one about every ten years because no way a new stove is going to last 3 decades. As for a flat top - she thinks it will be easier to clean but I've heard different.
Induction is easier to clean. Glass top with glowing coils is a pain in the ass. Make sure you get one with a speckled top. All black or white may look awesome in the showroom hut will look horrendous after use. Things stick. It gets some scratches. Textures hides some sins.The stove. My real estate agents bought us that stove back when you could squeeze them some. It's 30 years old. I've replace an oven element or two. However now that my wife is into baking more (thanks covid) she'd like one with better temperature controls, ours runs hot.
I'm perfectly fine with a new stove but I told her if we do we should expect to buy one about every ten years because no way a new stove is going to last 3 decades. As for a flat top - she thinks it will be easier to clean but I've heard different.
Looks great! We still need our bar area tiled to match the rest of the kitchen but our tile guy has gone MIA. Looked into doing it myself but still hesitant.Redid the kitchen.
New countertop, tap and sink.
New window
Built a bank of drawers into the space were we removed the dishwasher we never used
Painted the cupboards and new hardware. (a solid old school Hanover kitchen - no need to replace)
New tiled black splash
New LED lights.
Fresh paint for the walls.
Grand total $3200**- it's easy if you don't have to have natural stone c/t, new cupboards and do all the labour yourself.
** doesn't include the curved drawer front I need to have made after covid or a new stove as ours now looks way too small
View attachment 46963View attachment 46964
Can confirm...ours looks like crap after almost 2 years with it. Old owners had a spare that was brand new in box, so we bought it off them for $200.Induction is easier to clean. Glass top with glowing coils is a pain in the ass. Make sure you get one with a speckled top. All black or white may look awesome in the showroom hut will look horrendous after use. Things stick. It gets some scratches. Textures hides some sins.
EDIT: This is what I'd love to build in my backyard for an 'office' that's out of the house....
sburns
Well-known member
Nicely done.Redid the kitchen.
New countertop, tap and sink.
New window
Built a bank of drawers into the space were we removed the dishwasher we never used
Painted the cupboards and new hardware. (a solid old school Hanover kitchen - no need to replace)
New tiled black splash
New LED lights.
Fresh paint for the walls.
Grand total $3200**- it's easy if you don't have to have natural stone c/t, new cupboards and do all the labour yourself.
** doesn't include the curved drawer front I need to have made after covid or a new stove as ours now looks way too small
View attachment 46963View attachment 46964
I've never really like hardwood, or laminate in a kitchen, but this works well.
Flat top stoves look great, but they get scratched up too easily and require too much maintineance fuss, I'm going back to a coil for the next stove as they are more durable.
But no hood for the stove?
sburns
Well-known member
Man shedCan confirm...ours looks like crap after almost 2 years with it. Old owners had a spare that was brand new in box, so we bought it off them for $200.
EDIT: This is what I'd love to build in my backyard for an 'office' that's out of the house....
Company that I follow on IG does some great backyard officesCan confirm...ours looks like crap after almost 2 years with it. Old owners had a spare that was brand new in box, so we bought it off them for $200.
EDIT: This is what I'd love to build in my backyard for an 'office' that's out of the house....
Sent from my Pixel 3a using Tapatalk


