Enough of COVID...what are you doing to the house?

Working on Chez North this week.

Nothing like working on a 1920 house in the North. Woke up this morning and stepped in some bear **** when cutting the grass.

Managed to level the main beam in the basement, 1.5" variation over 24', must have moved the house jack 100 times. Bought a good Milliwakee laser level, first time not using a water tube to level a building... awesome tool.

Also took out the old 60 Amp screw in fuse panel. My service to the meter is 200A, as is the new panel. Lightning charger ready! Gas here us 2.29.

Tomorrow I cut out an old 10"run 10" rise staircase. Just laid out the replacement half-pace stringers, gotta cut them myself as the wait for stair builders is 4 months.
Levelled out a second beam and framed in the basement to first floor support walls for the new run of half-pace stairs. 5 stairs+ double stacked landing + 5 stairs is ready to assemble. Ran into a snag when the copper water service line (which comes in under the stairs) snapped off at the ground -- lucky the water was off at the street! Gonna be chippin out basement floor concrete this morning (where's @mimico_polak ?)

With stars on hold till tomorrow, will use the rest of the day to cut out the ancient HVAC ducting, today will be stripping miles of spaghetti wiring mess.

Got a woody bonus at the lumber yard -- $3 2x4s! The local lumber yard couldn't get 2x4s on a regular basis so they milled up 10 lifts and got them stamped. They have 3 lifts they can't sell them because they're real 2x4s (unplaned rough cut). Double bonus for me as the house is all real 2x4s which are no longer produced - saves me a ton of time with repair work as I don't have to furr out walls when replacing studs.
 
That's a nice score @Mad Mike! One of my neighbours offered me 2x4s for $1.50/each! But they're not stamped and will never pass an inspection.

However, for anything else that's not structural I'm going to snap a bunch up once he comes back from his 6 week vacation.

As for chipping out the floor...good times...good times indeed.
 
Levelled out a second beam and framed in the basement to first floor support walls for the new run of half-pace stairs. 5 stairs+ double stacked landing + 5 stairs is ready to assemble. Ran into a snag when the copper water service line (which comes in under the stairs) snapped off at the ground -- lucky the water was off at the street! Gonna be chippin out basement floor concrete this morning (where's @mimico_polak ?)
Couldn't you get away with a hole saw to make some room for a coupler? Or do you want to to pull a bunch of the line in case it is worn away?
 
A metric crap ton of small mills opened during the lumber rush making 2x out of all sorts of softwood . And no grading stamps , which is fine for a shed , but even if your not getting an inspection it sort of makes sense to have certified wood on anything you like to stay standing.


Sent from my iPhone using GTAMotorcycle.com
For some projects I wanted rough cut and it's not easy to find. Hell, I was doing a job at a mill/kiln site in northern ontario and asked if they would sell any and it was a hard no. Nothing left the site without grading and nothing can get graded without first getting planed. Good to know that the smaller guys may have some kicking around now. The quantity I needed wasn't enough to pay for a custom job.
 
There are more than 150 sawmills within a 100km radius of Kitchener. Mostly little guys and some specialty producers . And most just don’t want the headache of dealing with the public, Which is hard because sometimes a guy knows what he wants and is reasonable to deal with , and then they have a guy that wants to see 300 boards to select 2 pcs . That’s where the hard no comes in


Sent from my iPhone using GTAMotorcycle.com
 
Couldn't you get away with a hole saw to make some room for a coupler? Or do you want to to pull a bunch of the line in case it is worn away?
A concrete hole is a great idea - never thought of that -- I usually work with tools in the bag. That's a 5lb hammer and cold chisel.
 
Not much progress today -- I couldn't find the incoming the broken waterline line on the floor - unbelievable - like it was never there. I have a water main key, so I figured I'd turn on the water and watch for the geyser - nope, the cap on the lawn was rusted out and the hydrant downtube was packed with dirt. Had to call the town to repair. Since it's in the general area for the new stairs, the stairs wait another day. .

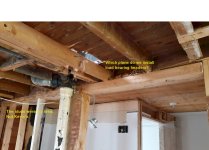
So another day of demo work. Peeled all the T&G off some interior walls. Found one 8' and 1 6' section of load bearing header with the 2x10's installed horizontally instead of vertically. The were sagging 1.5" mid span. Easy fix as I was reinstalling those walls anyway - 20 ton bottle jack, 6 x $17 2x6 and were are done.

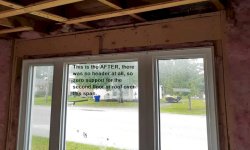
Now onto the sagging ridge. Part 1. After peeling off the T&T upstairs (anyone need 20 hefty bags of planer shaving insulation? - Free, must be picked up in Porcupine ON). The last owners hired window company to open the wall and install a 9' picture window to replace two 24" wide single hung units. The contractor hacked out 4 balloon studs and installed the new window without a header. 9' of roof rafter in a 50lb/psf snow load area supported by ? aluminum siding? Good news is it's an easy fix. Will install a new header tomorrow, and replace the missing studs on Thursday

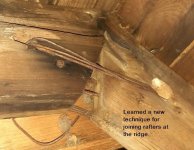
Part 2. Opened a hatch into the attic as I need to further investigate a sag in the roof ridge. Turns out a 20'wide shed dormer on the back of the house was poorly installed. The original rafters were used -- that's normal. They raised one end by 4', recut birdsmouths correctly. They didn't recut the ridge angles. Both original rafters are cut at 45, which mate nicely, now they don't. Further issues is they are lashed together thru a hole in each rafter using a few loops of mechanics wire. Good news, easy fix -- just gonna take a whole day. I'll take pictures tomorrow, this stuff should qualify for the the "Kevin HOF".

Nite ended with a little fun - it's light here well past 10, so I took the tin boat out to the local lake around 8pm. 3 x 2-3lb walleye and one 6 pounder. 11 pike, all between 4 & 6lbs. There are so many pike around here that I have to fish barbless.
 
Im facinated with "old home" construction fixes and how many were done by three guys that worked at the mine and did construction on the side. And a lot befiore any municipality had a building code.
Place we bought in KW had a garage with a 15deg lean , go inside to find half the collar ties taken out and 10 ceiling joists , new nieghbour said it was done 20yrs ago so they could store stuff up top easier. Great except adding 500lbs to the top of an unstable project? brilliant
 
Update on my first attempt at staining wood. Applied per manufacturers instructions and used their pre-stain. Did my pantry first as it's mostly hidden anyways. Floors/shelves are a mid-grey so I chose a stain to ,match and a light coat went on black (bare pine). I ended up sanding it as best I could and applied a coat of outdoor paint I had on hand that was a better match and then sanded that twice lightly to bring back some wood grain and lighten the colour to a better match.
Second attempt was livingroom cabinet tops. First coat was a match and it looked beautiful. Stain recommendation was to do two coats so I did that second coat thinking it was for good protection and depth (stain had poly in it) which ended up being a big mistake as it made it much too dark. I'm going to try to re-stain it with just one light coat and have hit it with 150grit which has brought back some spots of almost bare wood but many dark spots remain. I'll hit it with 100grit to see if I can get it any better then stain it. Any tips on getting it lighter before staining are welcome (water based stain btw).
Stain and poly mix is usually a bad idea. It seems like it may save some effort but you give up most control, this is what happened to you.

Go with the stain (straight stain, not a poly mix), apply until you get the darkness you want (apply wipe on off at the same time rubbing it in with a lint free cloth not with a brush then wipe). Then apply poly without the stain in it, oil or water based depending on how you want the final to look. Poly of course after the stain has dried.
 
I was one of these people in the late 80s, first house in 86, 2 more by 90. Market crashed and lenders would not renew underwater mortgages so 2 got sold a a huge loss, wiped out all my gains and I ended up moving from an 'estate' home into a starter.

"Some Canadians made decisions to take their mortgages out based on what they could be approved for and maybe didn't get some financial advice to say, well, 'I know I can get approved for a mortgage at this particular level, but what can I actually afford?'

Back then, and in most corrections anything above the current average price dropped huge, entry level homes stayed the same, in some places increased as over leveraged homeowners scrambled to downsize. Areas outside the GTA core with large suburban areas got hit the hardest - roughtly speaking I remember my 3200sq 'designer' home in Newmarket fell 35%, sis in Burlington the same, while my family with modest homes in Markham, Leaside and Burlington stayed the same, and my 1200 sq' starter in Keswick went up a bit. Further out of the GTA, Kitchener, Niagara, Bradford, Clarington were hit really hard on big houses.

If a correction happens, it will again be a great time for well vested homeowners to upgrade their dream - a bad time for those who stretched without planning.
 
Im facinated with "old home" construction fixes and how many were done by three guys that worked at the mine and did construction on the side. And a lot befiore any municipality had a building code.
Place we bought in KW had a garage with a 15deg lean , go inside to find half the collar ties taken out and 10 ceiling joists , new nieghbour said it was done 20yrs ago so they could store stuff up top easier. Great except adding 500lbs to the top of an unstable project? brilliant
My daughter's house had 2X4 rafters 16 feet long, Bowed like ski jump.

I added a mid point beam and jacked some of the bow out of them.
 
The stairs that scare me are the tiny treads , the 2x8 tread stock .


Sent from my iPhone using GTAMotorcycle.com
I'm replacing a 10 flight 9 rise 9 run to the second floor and a 10x8 to the basement. They are currently at opposite ends of the house, moving them on top of each other in the middle.gets me a small office and a nice hallway closet. Got super lucky -- home depot sells steel stringers, 5 stair run is $110 for the pair -- not bad considering 2X12 are $65 and I have a couple hours cutting time.
 
My daughter's house had 2X4 rafters 16 feet long, Bowed like ski jump.

I added a mid point beam and jacked some of the bow out of them.
I'm doing that now, using strongbacks.
 
Pics from the North.

The right side is the normal angle cut for a rafter, the left used to be until it was repurposed as a shed dormer rafter. I guess the nails were a bit too short, that wire held a 50PSF snow load roof for 80 years.

I'll be cutting back each rafter end at the correct angle and installing a ridge board.
ridge.jpg

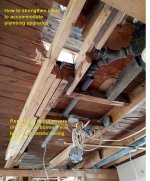
Need to strengthen a floor joist? Just scab in lots of support braces. Lucky for me this all comes out as it's above the opening for the new stair case.
joists.jpg

Kev got the right lumber (2x12s) but nobody told him which way they go in. Left of the post is going to be a wall do I left them and tossed in a few studs. The opening to the right is begging me to turn the headers upright.
header.jpg

Originally there were 2x 2x4 double hung windows at the front of the house, they were between 24" spaced balloon studs so they didn't need a header. Window company must have figured a 90" window could retrofit so they chopped off 3 load bearing studs and popped in the window with no header. Caused a bit of an issue for the floor above.
header 2.jpg

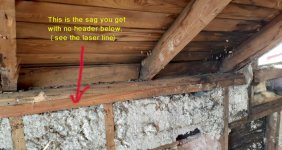
This is right above that headerless window. Sag was about 4". Easy fix, but needs an engineer to approve ($500)as there isn't really a building code to follow for balloon framed houses.
sag.jpg

To make a bad day worse, a bear hopped the fence into my yard while I was working, my cooler was on the picnic table, he opened it and stole my lunch. Fortunately he left the beer.
 
Back
Top Bottom