Enough of COVID...what are you doing to the house? | Page 17 | GTAMotorcycle.com

Enough of COVID...what are you doing to the house?

Better idea - tell her you'll buy her a nice new Macbook if she finishes the trim.

She's the breadwinner in the family right now working 10+ hours days....and I've been demoted to "house husband" whilst laid off....voluntarily laid off, or not LOL.

There would be expletives and possibly flying objects if I were to try that.
 
She's the breadwinner in the family right now working 10+ hours days....and I've been demoted to "house husband" whilst laid off....voluntarily laid off, or not LOL.

There would be expletives and possibly flying objects if I were to try that.
It's always easier to ask for forgiveness then permission...
 
I went grocery shopping which seems increasingly like a life of death experience right now....so I did a thing today.

Time to spend another few hours on the couch until I get poked at again. :ROFLMAO:

Went to Loblaws and the cart pushers were disorganized as usual but keeping a distance. Sort of like no contact bumper cars.
 
With my wife spending all her time on the second floor of our 2 storey house,i pretty much do anything i want. She won't know the kitchen when she sees it. It's white now instead of 80's oak.i bought a 1,000lb lift for the garage and put a new Beta on it.
I should get rid of the dead soldiers in the garage tho. Looks bad.
 
Are the legs fastened down (I hope so)? I am assuming no footings just expansion anchors into pad?
Not yet. There are anchor brackets that came with the unit, and until I have it in the FINAL location I won't anchor it down. Probably in the next day or two. I don't expect much issue as it's heavy and steady as heck. But better to be safe then sorry.

You can actually see the anchor brackets in the photo on the front right support beam base.
 
A metal roof gazebo was one of the best things we ever put in our back yard. It was so nice just leaving it up this past winter and not having a care in the world about it, and I stretch wrapped it with the clear stretch wrap from work so we just left all the furniture out there all winter as well - stayed perfectly dry and snow free all winter under it.

But get it secured down...quick. Heavy or not those things are like trailer parks in a tornado. Even if it doesn't fly away it may end up getting tossed around and damage if it gets torqued on one leg.
 
Not yet. There are anchor brackets that came with the unit, and until I have it in the FINAL location I won't anchor it down. Probably in the next day or two. I don't expect much issue as it's heavy and steady as heck. But better to be safe then sorry.

You can actually see the anchor brackets in the photo on the front right support beam base.
I would get at least two diagonal legs anchored down asap. Now that you have the roof up, you have made a kite. I had a tarp garage with a cinder block attached to each leg (~500 lbs of concrete) lift up in the air (high enough to clear the bike and other equipment inside and fly over 100' with all the blocks still attached. The landing did not go well for it.
 
I would get at least two diagonal legs anchored down asap. Now that you have the roof up, you have made a kite. I had a tarp garage with a cinder block attached to each leg (~500 lbs of concrete) lift up in the air (high enough to clear the bike and other equipment inside and fly over 100' with all the blocks still attached. The landing did not go well for it.
Guess I'm anchoring tomorrow then. Thanks for letting me know.
 
On the "my own projects" front... After a 4-5 month break, I've got back to actually finishing up all the nitty gritty on our kitchen reno.

Warning: Big long post ahead, but if you're thinking of a DIY kitchen reno, well, I can speak from experience now. This was all DIY with few exceptions.

I started this reno back in November and it became "basically functional" again about 2-3 weeks later when the counters arrived and I got all the plumbing hooked up again. At that point I was a little burned out and decided to take some time off (since it was a working kitchen again) for what was originally planned to be 2 or 3 weeks.

Well. Umm. :whistle: :LOL:

Was a classic crappy dark 80's kitchen when we bought the house with a "florida ceiling" drop light nightmare on top of it. We did the quasi (quick and dirty) "country kitchen" reno in 2001 or so and removed the drop ceiling (to do some cheap track lighting instead) when we bought the house and it kinda just stayed like that forever. It did not age well.

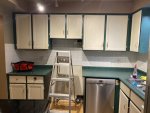
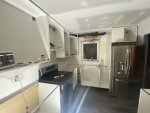
Anyhow, the kitchen went from this.... (Demo had just slightly started before I thought to snap a pic)

IMG_1601.jpg

To this.

IMG_1609.jpg

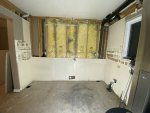
To this:

IMG_1679.jpg

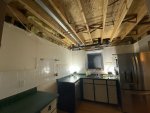
Getting rid of that drop ceiling ended up being far more work than I'd hoped - plumbing, HVAC, and a lot of electrical were "not so hidden" in the bulkheads. I did all the demo and the rerouting the HVAC. Electrician did the electrical reroutes.

IMG_1746.jpg

New floors went in at the same time through the whole main floor. Made sense to have them all done while the kitchen was completely gutted to the walls so the flooring went wall to wall under everything.

And a $4000 trip to Ikea. And a $500 sink. And new lights. And new everything. $500 here, $1000 there. $2500 new countertops. Ugh. It was a busy and expensive 2-3 weeks. Started to come together. SO much better with just the full height ceiling again. Went with full height cabinetry as we really wanted to maximize the storage capacity - we'd been dealing with a terrible lack of storage for almost 20 years.

IMG_1756.jpgIMG_1785.jpg

Slowly but surely. I absolutely LOVED the Ikea cabinetry. They have such a nice system that makes hanging them so easy - just one rail on the wall, plumbed and levelled, and everything just clicks onto it. Same for the floor cabinets, although there is legs for extra support there.

IMG_1809.jpg

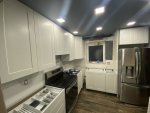
New countertops arrived a week or so after we ordered them. The grey ceiling and black countertops took a lot of convincing my wife (she had other ideas) but we love the result.

IMG_2248.jpg

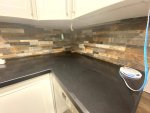
Went with these textured 8x24 groutless porcelain tiles for the backsplash. I love the look of stacked stone but they are problematic in a kitchen environment - porous, and hard to clean. These are textured and look like stacked stone, but can be just sprayed and wiped easily. They also went on insanely easily with just a tile saw and nippers. Rather pricy, but hey, I wasn't penny pinching - it'll be like this for probably another 20 years.

This whole section of countertop shown above is opposite the stove/sink and was actually just useless dead space before. Over the years we'd had various storage things jammed in the corner from cheap panties to shelving and such - it always looked like crap, and it didn't offer any counter space.

I'd always envisioned making it extra countertop and cabinet space (above and below) and we did exactly that. Moved the dishwasher there as well. The results were everything I'd hoped - TONS more storage and desperately needed counter space in anotherwise small kitchen with too much dead space previously.

IMG_2251.jpg
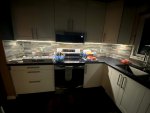
LED RGBW strip lighting (colour changing via Alexa) under counter lighting installed. SUPER happy with the result - the true white option lights up the kitchen workspace nicely, and at night it automatically goes to a 25% red light which is excellent for the night.

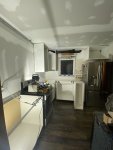
Anyhow, that pic above is where I left off around the first week of December. Got back at it today to finish the bulkheads over the window, get all the trim on, kick panels installed, and all the little trim bits and covers etc.

Pretty happy how it all turned out. I did pretty much everything myself short of the major drywall work - I *could* have done that but it was one of those things where I respect how quickly a proper tradesperson can do the job. It was done from the initial hang to ready for prime and paint in 3 days. It would have taken me WAAY longer and would probably never have looked as good.

Should have it 100% completed in the next day or two.

Total cost was probably something in the $6000-$7500 range by the time it was all said and done. Never did add it all up. But not complaining.
 
We put an Ikea kitchen in the last house, value for the money was hard to beat. I think we spent about 8K with them on boxes and cabinets, which is nothing compared to "kitchen specialists" .
Looks nice PP
 
@PrivatePilot That is some serious good work! Looks awesome!

@crankcall You're right. I think that IKEA kitchens get a bad rap (because 'IKEA') but I've seen them installed in a lot of houses, and in all honesty you'd be hard pressed to see much difference from a professionally installed 50k kitchen.

My buddies are in interior construction and frankly they send videos / pics of jobs sometimes, and the 'professional kitchen' installations are a lark. Such garbage quality a lot of the time, I'd be super ******. One 50k kitchen was laughable. Misaligned, ****** closing, no soft close on the doors/shelves...I'd be super ****** if I paid someone that type of money in a custom home.
 
We came pretty close to ordering the countertops through IKEA directly as well, particularly since we did this order during their kitchen event where you get a percentage back in gift cards, however their available options were pretty slim compared to a proper granite/quartz place.

When we actually started to do price comparisons between the IKEA cost and a local countertop company we found a far better deal by a long stretch at the local place. Lucked out and the colour we wanted happened to be on sale as well as it was about 30% cheaper than many other options on top of it all. Very happy with the supplier and the result after it was all done.
 
The original plan was for butcher block countertops as well. We both really liked the look, however thankfully I am a man of due diligence before buying anything, and when I looked into the realities of both the maintenance requirements and longevity of the butcher block option it quickly became evident this was not the best of choices for our typical use and abuse patterns.

In short: 80% chance it would have looked like crap inside 5 years. Google tells the tales.
 
@PrivatePilot For sure you'll get a better price (most times) from the local place. IKEA sources it out to the local places anyway. A few friends work for granite suppliers and they're all outsourced to HD, LOWES, IKEA, etc. Price is cheaper because you go direct, and if you can find a stone that's not a very popular one or has been sitting a while, you're set.

Out last home we purchased a stone that was sitting around for half a year so we got it for 50% off or something just because my wife liked it and happened to see it in the back of the shop.
 
On the "my own projects" front... After a 4-5 month break, I've got back to actually finishing up all the nitty gritty on our kitchen reno.

Warning: Big long post ahead, but if you're thinking of a DIY kitchen reno, well, I can speak from experience now. This was all DIY with few exceptions.

I started this reno back in November and it became "basically functional" again about 2-3 weeks later when the counters arrived and I got all the plumbing hooked up again. At that point I was a little burned out and decided to take some time off (since it was a working kitchen again) for what was originally planned to be 2 or 3 weeks.

Well. Umm. :whistle: :LOL:

Was a classic crappy dark 80's kitchen when we bought the house with a "florida ceiling" drop light nightmare on top of it. We did the quasi (quick and dirty) "country kitchen" reno in 2001 or so and removed the drop ceiling (to do some cheap track lighting instead) when we bought the house and it kinda just stayed like that forever. It did not age well.

Anyhow, the kitchen went from this.... (Demo had just slightly started before I thought to snap a pic)

View attachment 42801

To this.

View attachment 42802

To this:

View attachment 42808

Getting rid of that drop ceiling ended up being far more work than I'd hoped - plumbing, HVAC, and a lot of electrical were "not so hidden" in the bulkheads. I did all the demo and the rerouting the HVAC. Electrician did the electrical reroutes.

View attachment 42803

New floors went in at the same time through the whole main floor. Made sense to have them all done while the kitchen was completely gutted to the walls so the flooring went wall to wall under everything.

And a $4000 trip to Ikea. And a $500 sink. And new lights. And new everything. $500 here, $1000 there. $2500 new countertops. Ugh. It was a busy and expensive 2-3 weeks. Started to come together. SO much better with just the full height ceiling again. Went with full height cabinetry as we really wanted to maximize the storage capacity - we'd been dealing with a terrible lack of storage for almost 20 years.

View attachment 42810View attachment 42804

Slowly but surely. I absolutely LOVED the Ikea cabinetry. They have such a nice system that makes hanging them so easy - just one rail on the wall, plumbed and levelled, and everything just clicks onto it. Same for the floor cabinets, although there is legs for extra support there.

View attachment 42805

New countertops arrived a week or so after we ordered them. The grey ceiling and black countertops took a lot of convincing my wife (she had other ideas) but we love the result.

View attachment 42806

Went with these textured 8x24 groutless porcelain tiles for the backsplash. I love the look of stacked stone but they are problematic in a kitchen environment - porous, and hard to clean. These are textured and look like stacked stone, but can be just sprayed and wiped easily. They also went on insanely easily with just a tile saw and nippers. Rather pricy, but hey, I wasn't penny pinching - it'll be like this for probably another 20 years.

This whole section of countertop shown above is opposite the stove/sink and was actually just useless dead space before. Over the years we'd had various storage things jammed in the corner from cheap panties to shelving and such - it always looked like crap, and it didn't offer any counter space.

I'd always envisioned making it extra countertop and cabinet space (above and below) and we did exactly that. Moved the dishwasher there as well. The results were everything I'd hoped - TONS more storage and desperately needed counter space in anotherwise small kitchen with too much dead space previously.

View attachment 42807
LED RGBW strip lighting (colour changing via Alexa) under counter lighting installed. SUPER happy with the result - the true white option lights up the kitchen workspace nicely, and at night it automatically goes to a 25% red light which is excellent for the night.

Anyhow, that pic above is where I left off around the first week of December. Got back at it today to finish the bulkheads over the window, get all the trim on, kick panels installed, and all the little trim bits and covers etc.

Pretty happy how it all turned out. I did pretty much everything myself short of the major drywall work - I *could* have done that but it was one of those things where I respect how quickly a proper tradesperson can do the job. It was done from the initial hang to ready for prime and paint in 3 days. It would have taken me WAAY longer and would probably never have looked as good.

Should have it 100% completed in the next day or two.

Total cost was probably something in the $6000-$7500 range by the time it was all said and done. Never did add it all up. But not complaining.
Looks good PP.

Is the camera at eyeheight? Are you putting trim to hide the light strip? It won't matter much, I just think it looks much better if you can't see the strips.

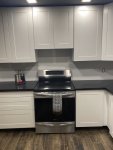
What is the thing over the stove? It looks small for a microwave and too microwave looking for a hood.
 
Looks good PP.

Is the camera at eyeheight? Are you putting trim to hide the light strip? It won't matter much, I just think it looks much better if you can't see the strips.

What is the thing over the stove? It looks small for a microwave and too microwave looking for a hood.

Photos actually taken around chest height or lower so yes you see the LEDs, but normally you would not. And yes there is actually a curved trim that needs to be installed along the bottom edge of all the cabinets. That’s one of the things I’ll be doing in the next day or two finishing things up.

And yes that is actually a microwave. One of the first things we did to the house was remove the stove fan and put in a overhead style microwave to minimize usage of our already slim counter space then. During the reno seeing as how we put the new cabinets full height to the ceiling, if we wanted to maintain the full sized microwave the overhead cabinets above it would have been so high that you would need a ladder to get into them. And small, of course.

Then we discovered they made slim microwaves now for exactly this scenario. A little bit on the pricey side but looks good and works perfect and the available measurements. And allowed the cabinets to be lower whilst still keeping the microwave flush.

it is indeed smaller inside of course, however when you think about the reality of what you put in your microwave 99% of the time it’s actually totally functional. In the six months we’ve had it now not once have I ever found it too small for something.

8ABFB2E9-B181-45CF-8B11-D373DACB88F6.jpeg
 
Photos actually taken around chest height or lower so yes you see the LEDs, but normally you would not. And yes there is actually a curved trim that needs to be installed along the bottom edge of all the cabinets. That’s one of the things I’ll be doing in the next day or two finishing things up.

And yes that is actually a microwave. One of the first things we did to the house was remove the stove fan and put in a overhead style microwave to minimize usage of our already slim counter space then. During the reno seeing as how we put the new cabinets full height to the ceiling, if we wanted to maintain the full sized microwave the overhead cabinets above it would have been so high that you would need a ladder to get into them. And small, of course.

Then we discovered they made slim microwaves now for exactly this scenario. A little bit on the pricey side but looks good and works perfect and the available measurements. And allowed the cabinets to be lower whilst still keeping the microwave flush.

it is indeed smaller inside of course, however when you think about the reality of what you put in your microwave 99% of the time it’s actually totally functional. In the six months we’ve had it now not once have I ever found it too small for something.

View attachment 42811
Works for me. Good solution. I agree, that height works for pretty much everything I would ever microwave, it's just an uncommon form factor for some reason.

Our last house had no microwave as I wasn't willing to sacrifice the limited counter space. The new house has an over-stove microwave and the wife is very happy to have one back.
 

Back
Top Bottom