I'd be digging and replacing as much as possible , it really looks like its all fairly pooched. Its ugly muddy work , but thats what I'd be in for. Done right, done once.
You are using an out of date browser. It may not display this or other websites correctly.
You should upgrade or use an alternative browser.
You should upgrade or use an alternative browser.
Enough of COVID...what are you doing to the house?
- Thread starter mimico_polak
- Start date
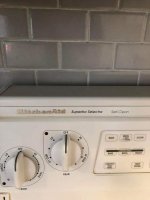
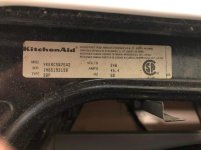
For oven elements, I walk into a a parts shop with the burnt one in my hands. Voltage will all be the same, I suspect most will have similar amperage (similar size box, similar max temp, no need for tons of sku's) so it comes down to an element that is a similar physical dimension. Obviously check with shop in case they have parts list. Older appliances would put a part list inside the cabinet (probably in the compartment behind the knobs) but I'm not sure if they still do that.Anybody know where to find old times manuals? Dads oven pooched and I’m trying to help him find the top/bottom heating elements.
Can’t find the exact model: KITCHENAID
View attachment 52846
View attachment 52847
I can find the similar models and I’m 95% sure it’s the same part numbers….but not 100%.
I would be concerned if both top and bottom went at the same time. They may be the symptom, not the cause.
Thanks @GreyGhost. Only the top went. But while I’m at it may as well replace both or have a spare for the bottom one.
Even Canadian Tire used to carry universal elements unplug the stove take the old one out bring it with you and stick the new one in easy.Anybody know where to find old times manuals? Dads oven pooched and I’m trying to help him find the top/bottom heating elements.
Can’t find the exact model: KITCHENAID
View attachment 52846
View attachment 52847
I can find the similar models and I’m 95% sure it’s the same part numbers….but not 100%.
Sent using a thumb maybe 2
Thanks. I always thought there were specialized / custom for each applicance.
Especially inside of the oven.
Especially inside of the oven.
I'm sure they will sell you ones that are "special" for each oven at an astronomical price. Most of those probably come out of the generic $40 element bin.Thanks. I always thought there were specialized / custom for each applicance.
Especially inside of the oven.
Been checking everyone but the part numbers are always 1-2 digits off. I’ll call a few places today though.
Damn GTAM has made me rethink of Kevining that cracked drain tile.
Damn GTAM has made me rethink of Kevining that cracked drain tile.
The elements will be in a few different form factors, just match the old one(s). Rona, CT and HD should have them. Lowes used to but I was there a few weeks ago for one and they said they no longer carry appliance parts.... Same shape and connectors is what matters IMO.
dont kevin it, unless your moving. You may be fine, or 9 yrs from now when you have put some nice stuff downstairs your doing it again. And your a decade older on a shovel. Don't make it smaller or create a bottle neck unless it wont be your problem later.Been checking everyone but the part numbers are always 1-2 digits off. I’ll call a few places today though.
Damn GTAM has made me rethink of Kevining that cracked drain tile.
Do you want to stay awake at night waiting for the mold smell ?
No you're right @crankcall. The actual proper thing to do is dig up the entire basement, put in a proper weeping tile system around it, and then install a sump pump.
Which I'm sure that I'll have to do eventually.
Both my dad's and my biggest concern right now is digging down, and damaging more of the pipe...and then digging further...and keep going and going and going.
Which I'm sure that I'll have to do eventually.
Both my dad's and my biggest concern right now is digging down, and damaging more of the pipe...and then digging further...and keep going and going and going.
Interlocking - who’s done it and any words of wisdom, things you’d do differently, tricks or techniques?
Considering doing our front entry path myself as it’s only about 19’ and I don’t mind doing the labour.
Considering doing our front entry path myself as it’s only about 19’ and I don’t mind doing the labour.
Base prep is everything. Wear knee pads. Your poor back.Interlocking - who’s done it and any words of wisdom, things you’d do differently, tricks or techniques?
Considering doing our front entry path myself as it’s only about 19’ and I don’t mind doing the labour.
Greyghost has it , dig a base to specifications, rent a compactor, follow the painful directions and Do Not cut corners . Done right it will look great for decades , done wrong it heaves In a season. I can’t stress enough renting the compactor. And digging to depth .
Sent from my iPhone using GTAMotorcycle.com
Sent from my iPhone using GTAMotorcycle.com
For oven elements, I walk into a a parts shop with the burnt one in my hands. Voltage will all be the same, I suspect most will have similar amperage (similar size box, similar max temp, no need for tons of sku's) so it comes down to an element that is a similar physical dimension. Obviously check with shop in case they have parts list. Older appliances would put a part list inside the cabinet (probably in the compartment behind the knobs) but I'm not sure if they still do that.
I would be concerned if both top and bottom went at the same time. They may be the symptom, not the cause
www.reliableparts.ca
I got some switches there (Caledonia Rd) and there was an old lady at the counter that really seemed to know her stuff.
Some universal parts will have a higher or lower wattage and while the roast still gets cooked the cook may have to adjust times and temps.
Someone mentioned unplugging the stove. Yes or turn off the breaker. I forgot that the switch only shuts down one side of the element and I ended up replacing a fuse. A flash of brilliance beats the flash of a short circuit. I got the latter.
I learned the one side thing the hard way lol.www.reliableparts.ca
I got some switches there (Caledonia Rd) and there was an old lady at the counter that really seemed to know her stuff.
Some universal parts will have a higher or lower wattage and while the roast still gets cooked the cook may have to adjust times and temps.
Someone mentioned unplugging the stove. Yes or turn off the breaker. I forgot that the switch only shuts down one side of the element and I ended up replacing a fuse. A flash of brilliance beats the flash of a short circuit. I got the latter.
Sent using a thumb maybe 2
Dad decided to buy a new stove for the house as the parts alone are $300 or so....new stove apparently $800. Considering the existing unit is 15+ years (and even KitchenAid doesn't have the part numbers/drawings) he's happier this way.
Thanks for the help / suggestions.
Thanks for the help / suggestions.
Frak...my buddy just recommended I replace the entire drain line to the sewer....sounds expensive.
If I thought about going that way, I would be investigating how to run the new line inside the old one. Basically they run a cone through to break the existing pipe and expand it and behind the cone is the new pipe. Same ID as original, new pipe, minimal digging. I suspect you need to do it from a pit outside and stop the cone when it gets to your basement hole. I've never done it though so the details are foggy.Frak...my buddy just recommended I replace the entire drain line to the sewer....sounds expensive.


