Gasket Leak on my GS500F...At least thats what it seems | GTAMotorcycle.com

Gasket Leak on my GS500F...At least thats what it seems

Freak

Well-known member
I was at work when i noticed this small pool of oil under the engine.....upon checking it with a friend it wasn't the oil plug, nor the oil filter cap. The only other place where might be coming from is the gasket on the left hand side of the engine. It seemed to be a bit off to the friend who was checking it, also the oil on the fairing was by the front gasket. Now i have never changed a gasket before and i am not even sure if that is the case to begin with. I have ordered one from snow city

http://www.oneidasuzuki.com/store/files/details/d_6699.jpg Number 15

this morning for 9$ which will arrive Thursday. The oil was almost empty....when i got home i saw a small pool of oil where i usually park my bike which made me realized it was leaking before i went to work on it.

Now is there any other place on the left side where it can leak from?? Also can someone help me put it on? My bike is a GS500F 2008. Since i will have to drain all the oil to change the gasket i was thinking of doing the oil change simultaneously which makes more sense.

Suggestion!! Help!!
 
Looks like the stator/rotor cover gasket, not that big of a deal to replace. Just make sure you scrape off all the old gasket material and mating surfaces are clean and level. No need to use gasket sealant, goes on dry. Be careful when reinstalling cover bolts, do not over torque or you'll strip the soft aluminum threads.
 
Unfortunately i did not take pictures of the engine, i took pictures of the leak when it happened and the parts where i could see oil. Somehow my attachments are too big and can not be attached. I found oil residue on the fairing bottom by the engine both inside and outside. The oil seemed to be a bit sprayed on the fairing inside as well, while the outer one only showed oil collected at the bottom ready to drip.
 
Unfortunately i did not take pictures of the engine, i took pictures of the leak when it happened and the parts where i could see oil. Somehow my attachments are too big and can not be attached. I found oil residue on the fairing bottom by the engine both inside and outside. The oil seemed to be a bit sprayed on the fairing inside as well, while the outer one only showed oil collected at the bottom ready to drip.

Where in Whitby are you ?
 
油井緋色;1829064 said:
http://gstwin.com/oil_change.htm

Your welcome.

It really isn't that hard. Only thing you can screw up on is overtightening of the screws.

He's not asking how to do an oil change, he's asking how to replace the magneto gasket. Did you even read the thread before replying?

Freak, as you know, I am having the same problem with mine right now. When I get the gasket, I'll be changing it out. Here's the basic steps:

1. Drain the oil
2. Remove the shift lever and then the front sprocket cover (you don't have to undo the clutch cable, just let it hang)
3. Remove the magneto cover
4. Remove ALL of the old gasket (I am planning on using gasket remover from Canadian Tire to speed the process up). Some people use a razor, some people say avoid this because it can score the metal
5. Install the new gasket dry
6. Replace magneto cover, and tighten bolts in a cross pattern
7. Replace front sprocket cover and shift lever
8. Install the new oil filter and fill it up

Here are more in-depth instructions that I have found
I know this is an old post but maybe my insight & experience will help the next guy.
I have an '08 Suzuki GS500F. I had to replace the stator cover gasket due to a poorly installed leaking aftermarket gasket. If you are sure your stator cover gasket is leaking, BUY A SUZUKI FACTORY REPLACEMENT GASKET! Most Suzuki dealers can have the gasket in 3 to 4 days if it's not in stock. A factory gasket is only $11.00, $3.00 more than an aftermarket gasket and it will save you a huge headache. Aftermarket gaskets are not made of the same material and are not the same size/shape which can leave critical seal areas grossly unprotected.
Good practice is to take pictures at regular intervals during the tear down.

During the job I had the following challenges:

To keep the mess to a minimum and perform some routine maintenance at the same time, it's a good idea to go ahead and change the oil and filter. There is a site dedicated to the GS500 located at http://www.gstwin.com/ this site has a very good, accurate step by step oil change guide. I highly recommend viewing the oil change instructions prior to starting the tear down.
Put the bike on the centerstand to raise the bike higher off the ground and keep it stable and level during the tear down.
Before removing the stator cover, drain the engine oil and then change the oil filter. The trick to removing the 3 oil filter cover nuts without getting oil all over the exhaust headers is to loosen the bottom oil filter cover nut first. Only barely loosen the top two nuts enough to allow the spring inside the filter cover to push the bottom of the cover out allowing the oil to drain straight down to your drain pan then completely remove the oil filter cover. Access to the oil filter cover is easy and does not require loosening the exhaust headers. Even if you're not planning to replace the oil filter, loosening filter cover and draining the oil from the filter area is essential to draining the oil from the oil cooler. If you decide to change the oil filter ($6.00 at most auto parts stores.), the new filter comes with a new gasket. Use it! After all the oil has drained from the filter area replace the oil filter cover paying close attention to the oil filter gasket alignment when tightening the nuts.
Disconnect the battery.
You must remove the shifter lever & sprocket cover to get at 3 additional stator cover bolts under the sprocket cover. The sprocket cover uses bolts of different lengths so be sure to thoroughly clean the threads and lay out the bolts on a paper towel in the same pattern.
The clutch cable is attached to the sprocket cover so carefully hang it out of the way using a wire coat hanger to avoid scratching the engine case and having to completely disassemble the clutch cable assembly from the sprocket cover.
After removing the sprocket cover, remove the clutch compression cantilever pin from the transmission case by pulling it straight out. Clean the pin and debris from around the pin hole and put the pin in a safe place. Degrease the area surrounding the front sprocket.
Remove the stator cover bolts, clean the bolt threads very thoroughly and arrange them nearby on a paper towel in the same pattern that they were removed.
Remove the stator cover by carefully pulling it straight off. You will feel a relatively strong magnetic pull that can make removing and replacing the stator cover somewhat difficult.
There is supposed to be a small amount of engine oil in the stator side to lubricate a set of gears above the stator, under the cover. The stator is adequately protected from engine oil by the design of the cover. Degrease the inside of the stator cover and the engine area under the stator cover.
When removing the stator cover, be careful that the gear pins under the cover near the top do not come out with the cover allowing the gears to fall off.
If you're lucky, the gasket material will stick completely to the engine. Hang the stator cover out of the way with a wire coat hanger to avoid stressing the electrical wires and scrape the gasket material from the engine. DO NOT USE A FILE TO REMOVE GASKET MATERIAL FROM THE ENGINE CASE OR COVER! I used a very sharp pocket knife to scrape the gasket away to avoid removing metal while scraping.
The old gasket may stick to both the cover and engine. Gasket Remover expedites removal of old gasket material from the cover and removal can be time consuming due to the fact that the stator electrical wires are attached and routed through the cover.
Trying to remove the screws that route the electrical wires and pick ups on the cover is an exercise in futility and the wires do not disconnect from the main electrical harness.
After the gasket material has been completely removed from both the cover and engine, run your fingers over the contact areas on the cover and engine to make sure the surfaces are shiny and smooth. Any dark patches should be scraped until shiny. The dark patches are areas where gasket material has not been completely removed. Degrease again. Clean and dry the contact surfaces. Engine degreaser or brake cleaner cleans them up nicely. Lightly oil and replace the clutch compression cantilever pin back into the transmission case.


When I picked up the new gasket at the Suzuki dealer, the Service Manager advised me of 3 keys to successfully seal the new gasket:
1. DO NOT USE RTV or any other type of gasket sealant on this gasket. Install it clean, dry and oil free. Using RTV or gasket sealant can leave gaps in the contact surfaces.
2. When mounting the stator cover, there is only one 10mm hollow pin to align the gasket. Mount the replacement gasket to the cover using the alignment pin on the cover. Align the gasket so you can clearly see all of the bolt holes. Carefully slide the cover back onto the engine. You should hear a solid "Clunk" noise when the cover is perfectly aligned and flush to the engine. Gasket alignment is critical to a good seal and can be difficult to accomplish because of the strong magnetic pull of the stator magnets. You will see and feel approximately 1mm of gasket material all the way around the cover when it is aligned properly. After you have the cover back on the engine, make absolutely sure the cover is flush against the engine by giving it a few solid thumps with your hands to avoid warping or cracking the stator cover when tightening the bolts. Use a flashlight to make sure the cover is flush all the way around and shine the light into each bolt hole to make sure the gasket did not shift and block any of the bolt holes. Punching a bolt through an improperly aligned gasket will ruin the entire job.
3. Use one drop of Blue (Removeable) Loctite Threadlocker on every bolt thread. DO NOT USE RED (Permanent) LOCTITE! Lightly snug up each bolt using a criss-cross pattern and then recheck the cover to make sure it is still flush all the way around and look and feel to make sure the gasket is still aligned properly before tightening the bolts. DO NOT USE A TORQUE WRENCH! The Suzuki Service Manual does not have a torque recommendation for these bolts. Tighten each bolt until it is snug. DO NOT OVER TIGHTEN!

Allow at least 2 hours for the loctite to dry then carefully check each bolt to make sure they are snug. Again, DO NOT OVER TIGHTEN!
Replace the sprocket cover (Don't forget to oil and reinstall the clutch compression cantilever pin.) It's a good idea to use a drop of Blue Loctite on the sprocket cover bolts as well.
Top off the crank case with 2.8 liters of 10W40, start the engine, check for leaks, shut it down and recheck the oil level. You will probably need to top off due to oil being pumped into the oil cooler and if you replaced the oil filter.
 
油井緋色;1829064 said:
http://gstwin.com/oil_change.htm

Your welcome.

It really isn't that hard. Only thing you can screw up on is overtightening of the screws.

This is funny considering its coming from the guy who used an impact wrench for his axle bolt then forgot which way to loosen the chain adjusters.
 
I say it's coming from excess chain lube, Counter shaft seal, or clutch push rod seal.
 
I say it's coming from excess chain lube, Counter shaft seal, or clutch push rod seal.

My SV650 had a problem with the clutch push road seal slowly leaking oil. I replaced the seal and added a little gasket stuff and it hasn't leaked in two years.
 
I say it's coming from excess chain lube, Counter shaft seal, or clutch push rod seal.
Checked the push rod seal and counter shaft seal (that was the first thing checked.) Inside the clutch and front sprocket housing it was dry of oil (just some grime from uncleaned chainlube.)

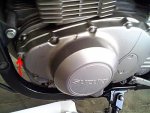
Checking along the edges, it looks like the gasket is broken slightly below the bolt the arrow is pointing at (in the pic). The gasket was visibly broken on the outside.

Checking above it, it was dry (no oil) and below it there was oil. Looks like the oil was leaking down the sides, covering the bolts, dripping onto the ground, the fairing, and the stands.

So this led me to believe it was the gasket. I'm not sure if it's the only problem, but I'm pretty sure its one of the problem--as it was visibly broken on the outside.
As a side note: the gasket was also sticking out pretty far.

If it's not the reason for the oil leak, it's still a good idea to replace it, just in case. And if it is the reason, the huzzah!
 

Attachments

  • gasketleak.JPG
    gasketleak.JPG
    23.2 KB · Views: 55
What's with that big gouge on the top of that cover?
 
What's with that big gouge on the top of that cover?
That's just a pictures i found on google images so i could make an arrow. 'tis not his bike, his bike looks a little better.
 
He's not asking how to do an oil change, he's asking how to replace the magneto gasket. Did you even read the thread before replying?

Freak, as you know, I am having the same problem with mine right now. When I get the gasket, I'll be changing it out. Here's the basic steps:

1. Drain the oil
2. Remove the shift lever and then the front sprocket cover (you don't have to undo the clutch cable, just let it hang)
3. Remove the magneto cover
4. Remove ALL of the old gasket (I am planning on using gasket remover from Canadian Tire to speed the process up). Some people use a razor, some people say avoid this because it can score the metal
5. Install the new gasket dry
6. Replace magneto cover, and tighten bolts in a cross pattern
7. Replace front sprocket cover and shift lever
8. Install the new oil filter and fill it up

Here are more in-depth instructions that I have found

I thought the gasket was that ring thing around the filter? <_<
 

Back
Top Bottom