Enough of COVID...what are you doing to the house? | Page 463 | GTAMotorcycle.com

Enough of COVID...what are you doing to the house?

I've got these things around a few trees on my lot (actually these are City of Mississauga trees) that my wife doesn't like any longer. She wants to get rid of them but feels the tree will fall out. I believe they're only ornamental and will have zero effect on the tree.

View attachment 66398

Thoughts on removal? I assume there's a chance that the roots are within the enclosed area, and that could cause issues.

As for soil, I called a few of the shops recommended here and all of them said the same thing 'No soil deliveries until April', so that's unfortunate as I wanted to get going on this before the house work starts.

Also....aeration BEFORE or AFTER the soil gets here?
Call the city arborist. I've found those people are super nice to work with if you call before you torture your trees. Not so much if a neighbour calls or a tree falls down because of the way you treated it.

They will tell you what is possible, and arrange for the city to do the work if it's their tree.
Thanks. Will do. Biggest issue is the stone around the trees is being uprooted by (I assume) roots going up out of the ground.

It's starting to look unkept and I'd rather bring it back to some proper form. I like the trees. Wife would cut them down if she could.

We have zero trees in the backyard...thanks Kevin you useless twat.
 
You can also drill your test holes just above the baseboard. Almost every baseboard needs recaulked anyway. The caulk will hide your test holes.
Yes this, also beside a switch cover (my old outlets were in the baseboard and were no help but others can use that) if one is on the same wall to find which side the stud is on (If I cannot see it with the cover removed). Then measure out from there to get an "approximation".
 
have trees , must rake. I'm respecting your wife more all the time , wise woman.
Spent some time raking and burning pine needles on Friday, barely put a dent in what needs to be done....
 
Spent some time raking and burning pine needles on Friday, barely put a dent in what needs to be done....
In all honesty, with the size of your property. I wouldn’t even bother. Maybe a small section near the house, the rest of it…let nature do its thing.

Buddy had a large property near Algonquin park, he says there’s zero point of clearing the leaves and needles. There’s just too much of them.

My parents on the other hand want their cottage land free of any pine needles or leaves so we do a yard clean 2x in the fall, and 1x in the spring.

Sadly for my mom that’s literally the only time she goes up…if that per year.
This is by the house, in other areas around the property I'm just removing branches or anything else that will be a pain for mowing.
The last occupants did not maintain to my standards, so some clean up is required. Good exercise, fresh air and not costing money make for an enjoyable afternoon...
 
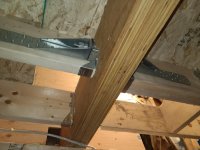
So the "rafter ties" are split into three segments across the span? What is carrying the tension across the breaks? Nailing off plywood instead of screwing it?
I meant to follow up on this a long while back and the thread is fading a bit so some new injection, project is still on going but we are hanging drywall etc now (taking way longer than expected, as usual), this is how I carried the tension through the beam from rafter tie to rafter tie.

1711570726018.jpeg

I used tension ties on either side. The through holes are dead centre on the LVL (neutral point, so minimum to no compression or tension change for the LVL) within the specs (location, number and size) for this LVL. The OSB also bridges the ties, PL glued and this board screwed with structural/construction rated screws. The design was also changed and the only break in the rafter ties is on this beam not twice like my orginal design if anyone remembers (that did not fly). Way more than I needed but what the hey I live here.

Normally one would rest the two rater ties on top of the beam (or a wall) side by side (overlapping) and nail them together to accomplish this but the beam had to be recessed in my case.
 
Last edited:
This is how you Kevin….

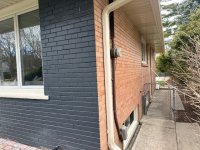
Flipping a house? Only paint 50% of the exterior because…reasons…

1711740113456.jpeg

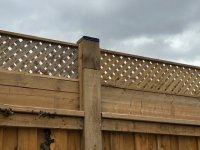
Realized your fence is too short and you want it higher? No problem!

1711740148412.jpeg

The Kevin way! His spirit is strong in the hood.
 
Wife finally got me to move the tv to another wall….

1712187949864.jpeg

Looks like I need a bigger tv, and some proper cable management.

That wall doesn’t appear to have much there but strapping and block as that wall is shared with the garage.

The PS5 is going back to its rightful owner once I make a fresh batch of grapefruccelo.
 
Bike related but not mechanical so its going into the house category.

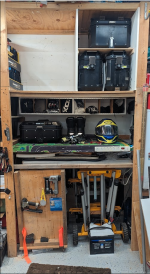
I reconfigured my storage for bike accessories. I picked up the small Givi case last season and didn't have a good spot to store it when not on the bike. Boots were also often in the house and always in the way.

The upper shelf was just one big open shelf of disaster that I am too embarrassed to post a before picture of. The bottom shelf was sort of what it is now but without the small divider shelving unit. It would hold my 3 bigger Givi cases and were always crammed in there.

I added the upper right side shelf for my Givi Cases and made the slotted dividing shelf from some scrap wood. Each accessory has its own spot now. The dividers can be placed anywhere along the shelf as the slots are in 1 inch increments.

I still want to get a motorcycle related flag or banner, cut it down the middle and hang it on some paracord. Creating a curtain. It should prevent me from placing random items on any available spot.

Bonus points for me because I finally used up some scrap wood that has been lingering around for 8 years or so. In hoarding terms that virgin wood.

1713149862514.png
 
Has anyone here installed oak strip flooring (not modern HW in this context)? Any tips?

This is the flooring you see in many 1940s and older homes, not modern hardwood or engineered. The pieces are tongue and grove but only 3/8" thick. Width is usually a narrow 1 1/2" or 1 3/4". We have it throughout our 1940s house (1 3/4" wide) and I found a source for new unfinished red oak strip flooring (3/8" X 1 3/4") that will allow a floor in a new room to look like the rest of the house, and that it was always there (the floor does not directly connect to the rest so there is no need to interlace, transition, etc.).

I have installed plenty of 3/4" HW, etc. but never this stuff. It does not look like I can use the usual flooring nailers (the ones you hit with the hammer to trigger) as it is thinner than they can be set, I can get pneumatic a flooring stapler that goes down to 3/8". The subfloor is 3/4" OSB, joists 16" OC. The thickness (thinness) gives me the most pause...

Any tips, real world experience, should I us an underlay, size and gauge of staples, etc.
I haven't done that type of floor. I would go with 18 ga stapler. I think you are correct and 15 ga cleats would cause too many splits.

As with all hardwood, flatten the floor with a belt sander first. Most floors are crap. That is probably even more important with thinner flooring. If it takes too much to flatten it, I'd throw another layer of subfloor on top afterwards. I always use wax paper between subfloor and hardwood.
 
Has anyone here installed oak strip flooring (not modern HW in this context)? Any tips?

This is the flooring you see in many 1940s and older homes, not modern hardwood or engineered. The pieces are tongue and grove but only 3/8" thick. Width is usually a narrow 1 1/2" or 1 3/4". We have it throughout our 1940s house (1 3/4" wide) and I found a source for new unfinished red oak strip flooring (3/8" X 1 3/4") that will allow a floor in a new room to look like the rest of the house, and that it was always there (the floor does not directly connect to the rest so there is no need to interlace, transition, etc.).

I have installed plenty of 3/4" HW, etc. but never this stuff. It does not look like I can use the usual flooring nailers (the ones you hit with the hammer to trigger) as it is thinner than they can be set, I can get pneumatic a flooring stapler that goes down to 3/8". The subfloor is 3/4" OSB, joists 16" OC. The thickness (thinness) gives me the most pause...

Any tips, real world experience, should I us an underlay, size and gauge of staples, etc.
I patched some to match a closet that got changed. It went down over the original 3/4" spruce board sub floor.

All I remember was nailing at 45 degrees through the tongue. I'm not sure how OSB holds nails.

I used some prefinished 3/8" strip flooring to accent a parquet floor a few decades back but it was glue down along with the pre-finished parquet. I probably added a few finishing nails in key spots.

Google showed several air nailers. Lots of little nails sound better than a few fat ones.
 
I used to sell the 3/8 strip flooring when I worked in a lumberyard , it was made by Knights of Meaford for about 100yrs , I think they finally went out of business.
A 3/8 stapler was never recommended as it holds the floor too tightly , I needs some room to move a bit. We had lot of success using an 18g nailer and 1 1/4 1 1/2” nails . Traditionally it was hand nailed with 1 1/4 finish nails , imagine a whole house of that job .
Since it was designed in the 1800s when central heat wasn’t a thing and summer / winter humidity in a house had wild swings , it needed to move . Modern houses may allow stapling , my instructions are from the 70s .


Sent from my iPhone using GTAMotorcycle.com
My daughter's house has strip flooring but it isn't tongue and groove. Just rectangular cross section circa 1929. IIRC there were two finishing nails side by side every couple of feet.

It worked out great to access joist space to get around the knob and tube wiring. Pull a strip, bore a hole, run NMD through the joist space and replace the strip.
 

Back
Top Bottom