If you have to bathe little kids soft water makes them like little greased pigs.I may put a softener in the house to cut back on buildup on fixtures. As house was not built for both hard/soft and I don't want soft everywhere (I agree, it's gross to drink), I plan on putting the softener just on the line to the hot water tank. Cuts the deposits on fixtures by about half, keeps lots of crap out of the hot water tank. My parents built their house for both so kitchen and bathrooms had a separate hard water tap.
You are using an out of date browser. It may not display this or other websites correctly.
You should upgrade or use an alternative browser.
You should upgrade or use an alternative browser.
Enough of COVID...what are you doing to the house?
- Thread starter mimico_polak
- Start date
I haven't found a water softener in the house yet. Checked every nook and cranny and can't see it anywhere...so I don't think Kevin put one in. Unless it's hidden very very well.When we bought our house we found the water terrible because of a water softener. It turns out that mimico_polak's friend Kevin must have put it in. Everything in the house got salt water, including I think the lawns. I had to replace everything that was brass. Copper seems to be OK.
I cleaned up a gazillion range hoods at the ReStore. The little dampers on the back are never more than greasy.My main concern is what happens if both are on at the same time? Second concern, how long will the dampers last with what goes through a range hood?
If you do that you'll be buying new kettles, coffee makers and a dishwasher before too long. (Or maybe your water isn't as hard as it is here in St Marys).I may put a softener in the house to cut back on buildup on fixtures. As house was not built for both hard/soft and I don't want soft everywhere (I agree, it's gross to drink), I plan on putting the softener just on the line to the hot water tank. Cuts the deposits on fixtures by about half, keeps lots of crap out of the hot water tank. My parents built their house for both so kitchen and bathrooms had a separate hard water tap.
The water is pretty hard (I haven't tested it to get a number). House is 15-20 years old and has never had a softener installed. Citric acid cleans up the crust on food touching appliances, vinegar for the showers.If you do that you'll be buying new kettles, coffee makers and a dishwasher before too long. (Or maybe your water isn't as hard as it is here in St Marys).
Only place I see any buildup is on the water kettle...and that's after a few weeks or a month of us. Maybe more.The water is pretty hard (I haven't tested it to get a number). House is 15-20 years old and has never had a softener installed. Citric acid cleans up the crust on food touching appliances, vinegar for the showers.
Outside of that, no real issue.
It already is. I’m already a little concerned that I can’t get to the fixtures underneath if I need to currently.This sounds like one of these little projects that is going to evolve into something much larger.
I probably had Mimico‘s contractor Kevin originally as another little surprise they left for me was that they dry walled over an attic access point when they renovated and moved some walls around.
Yeah I was gonna say stock up on vinegar.The water is pretty hard (I haven't tested it to get a number). House is 15-20 years old and has never had a softener installed. Citric acid cleans up the crust on food touching appliances, vinegar for the showers.
Our water is pretty hard here (nick named The Stowntown for good reason). Before the softener we cooked a dishwasher rather quickly.
Yeah I was gonna say stock up on vinegar.
Our water is pretty hard here (nick named The Stowntown for good reason). Before the softener we cooked a dishwasher rather quickly.
Limestone City here. We get vinegar in bulk from Costco. 8L at a time. Like Frank’s Red Hot Sauce…that **** goes on anything. Shower doors etc. We replaced some tempered glass shower doors a few years ago with new ones as the old ones had gotten so bad with deposits they had etched in places. Now I have a squeegee and the doors get wiped down after every shower and then cleaned with vinegar at the weekends.
Today was a quick education for me on common household electrical switches, dimmers and sockets. We’ve had the same horrible beige coloured contractor special old style switches and sockets in the house for 20 years and with the place being painted they don’t match anything. Today I learned Lutron and Levitron switches and sockets can share the same deco wall plates and that all dimmers are not equal when it comes to LED lights. I also realized that someone was on crack when they wired some of the lights in the house. We have two lights separated by several walls that are operated by three separate switches. Not sure what to do about that one.
Anyway, should be a simple project to do along with adding some new lights around the house. It’s amazing how inexpensive LED fixtures have become now with the added bonus that they seem to be a lot lighter and easier to install.
Anyway, should be a simple project to do along with adding some new lights around the house. It’s amazing how inexpensive LED fixtures have become now with the added bonus that they seem to be a lot lighter and easier to install.
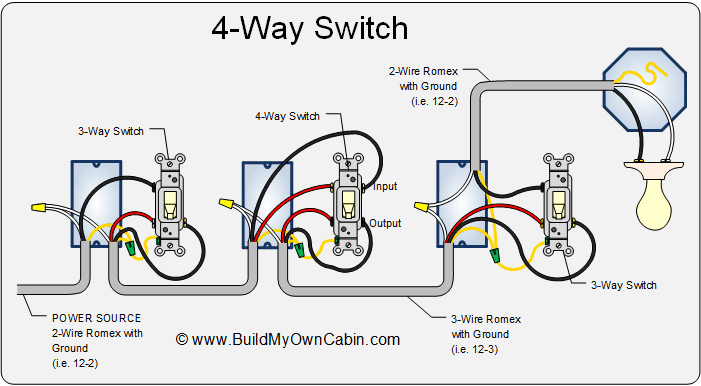
I am assuming the two lights both turn on or off when you move any of the three switches. Highly likely you need two three way switches and a four-way switch to make that work (see image below for typical wiring). Old wiring may not make sense though (high probability that power enters through the fixture and proceeds through the switch chain and the switch chain may cheat and use white as hot). There are many ways to accomplish the same task, some are easier to figure out than others. Another option is anywhere switches which allow wireless control of a master switch. The wireless units look like decora switches. That way you need to figure out wiring to one switch and the lights and can ignore the chaos at the other switches (properly cap and terminate the questionable wires).I also realized that someone was on crack when they wired some of the lights in the house. We have two lights separated by several walls that are operated by three separate switches. Not sure what to do about that one.
If you haven't already, you will also figure out that LED's plus fancy switches (dimmer, timer, etc) can result in dim light even when off. They don't use physical contacts to switch so there is some leakage. You would have had it on incandescent too but it is nowhere near enough to see as light in incandescent but some led bulbs will light with the trickle.
sburns
Well-known member
Here's what I've been up to the first part of 2023.
At the end of last summer I noticed some bad ordure around the house. Specifically around one area. I suspected what I might be. But didn't have time to rip anything apart until the beginning of the new year.
I had already did some work in this area beginning of last year, thought I had solved this as it was a problem previously as well. What I am referring to is the plumbing stack and how it connects to the upper part of the stack.
Here is what it looked like once I ripped everything out.
That spot where the ABS meets the metal pipe the fitting was failing.
Here is a better look why, as the metal had a hub like connector preventing a proper fit
So I had to fix that, but there were other issues with drainage and venting. So I had to re-direct some stuff and add more venting for each source. Now it looks like this:
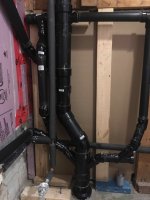
New fitting between ABS and metal fits perfectly, now that I cut out the hub part.
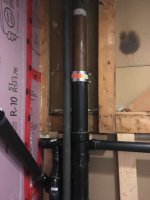
What a difference! Not only that but I could feel the change in the house once it all got reconnected and vented properly.
A friend of mine said I was lucky to be alive
Tested everything no leaks and started to put back the framing. By next weekend should be all back together.
I can see how plumbers are worth the money. This wasn't easy work, physically very demanding.
At the end of last summer I noticed some bad ordure around the house. Specifically around one area. I suspected what I might be. But didn't have time to rip anything apart until the beginning of the new year.
I had already did some work in this area beginning of last year, thought I had solved this as it was a problem previously as well. What I am referring to is the plumbing stack and how it connects to the upper part of the stack.
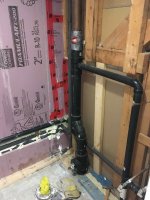
Here is what it looked like once I ripped everything out.

That spot where the ABS meets the metal pipe the fitting was failing.
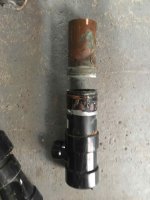
Here is a better look why, as the metal had a hub like connector preventing a proper fit

So I had to fix that, but there were other issues with drainage and venting. So I had to re-direct some stuff and add more venting for each source. Now it looks like this:

New fitting between ABS and metal fits perfectly, now that I cut out the hub part.

What a difference! Not only that but I could feel the change in the house once it all got reconnected and vented properly.
A friend of mine said I was lucky to be alive
Tested everything no leaks and started to put back the framing. By next weekend should be all back together.
I can see how plumbers are worth the money. This wasn't easy work, physically very demanding.
Attachments
sburns
Well-known member
I was a little worried about the fernco fitting. As it was something I had in there before. But I discovered some stuff about them on this project. Not all fittings are the same dimension. Some which are labelled 3" are not, and measured differently from others, and the pipe. I went through about 3 different brands before I found the "one" that fit correctly.
The other thing I learned sourcing out parts. Home hardware had stuff HD, Rona, and Lowes didn't and the pricing was much more reasonable (meaning it appears they haven't jacked up prices like the others), which was nice. Like that fitting was $10 at HH and HD was $22 for their equivalent.
Too bad there isn't a HH store close to me I or might use them more for stuff.
I got Lutron dimmers and Levitron switches and sockets. Apparently the Lutron dimmers have been tested with a wide range of LEDS for compatibility and seem to have better reviews. We will see. As for the weird wiring I might just leave it for now. I have plenty of other things to be getting on with.I am assuming the two lights both turn on or off when you move any of the three switches. Highly likely you need two three way switches and a four-way switch to make that work (see image below for typical wiring). Old wiring may not make sense though (high probability that power enters through the fixture and proceeds through the switch chain and the switch chain may cheat and use white as hot). There are many ways to accomplish the same task, some are easier to figure out than others. Another option is anywhere switches which allow wireless control of a master switch. The wireless units look like decora switches. That way you need to figure out wiring to one switch and the lights and can ignore the chaos at the other switches (properly cap and terminate the questionable wires).
If you haven't already, you will also figure out that LED's plus fancy switches (dimmer, timer, etc) can result in dim light even when off. They don't use physical contacts to switch so there is some leakage. You would have had it on incandescent too but it is nowhere near enough to see as light in incandescent but some led bulbs will light with the trickle.

What’s the correct way to cap wires (live) you no longer need though?
sburns
Well-known member
Thanks!Good job @sburns ! I would’ve never figured out that more venting was required.
How’d you figure that one out and where are all those vent lines going?
I did a ton of research before I started. Meaning looking at videos of plumbing venting and what were the correct fittings to use, when, and direction. Download a couple of brochures from IPC (international Plumbing Code) and from the city of Winnipeg, which have great example drawings. Looked at any physical building plumbing when I was out and about.
Basically the main stack can drain and vent your plumbing. But I also wanted to have each feed have it's own kind of vent so it didn't rely just on the 1 connection to the main stack. Double venting if you will. One off the feed, which loops back to the main stack (I think it's called a relief), and the stack itself. This should prevent any bad air coming back through say to your sink etc. From my research it seems more venting is better then less and there was no downside to it. Eventually the main stack is the final end point, which goes up to the second floor out to the roof.
Once that was figured out I set out with a drawing of what I wanted to accomplish and sourced all the fittings before I did anything.
They are (presumably) in a rated box already. Marrette on the wire and push it to the back. Ideally you would label it to help the next person minimize headscratching. Obviously you may not entirely understand the wiring now but anything helps (eg. four-way switch porch light).I got Lutron dimmers and Levitron switches and sockets. Apparently the Lutron dimmers have been tested with a wide range of LEDS for compatibility and seem to have better reviews. We will see. As for the weird wiring I might just leave it for now. I have plenty of other things to be getting on with.
What’s the correct way to cap wires (live) you no longer need though?
Either make sure the power is dead before touching wires (right way) or be careful (wrong way but faster).
Want to replace my thermostat with a smart one but it requires a C wire. Current thermostat doesnt have one. New one has a C wire adapter included but have read that sometimes it doesnt work. I may be able to run a length of 5-wire from the thermostat down to the furnace but there is some things going on down there that I dont know what to do with.......
- 5 wire at furnace board
- connections from 5 to 4-wire outside furnace, black on board (Y) switches to yellow, green on board switches to blue
- another connection above furnace (for a/c unit?) 4 wires to 4
- connections to existing thermostat, 4 wires
If I can get the 5-wire from the thermostat to the furnace do I stop at where the a/c(?) wires connect and do the same but continue running the brown down to the C on the board?
- OR -
can i just run one wire down from the thermostat to the furnace board for the C
- OR -
do I just use the C adapter and hope for the best
- OR -
do I just switch the green on the board to the C and use the green (blue) at the thermostat as the C. Apparently this means I lose control of the fan (auto/On). I am currently running the fan On all the time.
I tried to upload pics but they are too 'big'
Use imgbb or imgur for pics.Want to replace my thermostat with a smart one but it requires a C wire. Current thermostat doesnt have one. New one has a C wire adapter included but have read that sometimes it doesnt work. I may be able to run a length of 5-wire from the thermostat down to the furnace but there is some things going on down there that I dont know what to do with.......
- 5 wire at furnace board
- connections from 5 to 4-wire outside furnace, black on board (Y) switches to yellow, green on board switches to blue
- another connection above furnace (for a/c unit?) 4 wires to 4
- connections to existing thermostat, 4 wires
If I can get the 5-wire from the thermostat to the furnace do I stop at where the a/c(?) wires connect and do the same but continue running the brown down to the C on the board?
- OR -
can i just run one wire down from the thermostat to the furnace board for the C
- OR -
do I just use the C adapter and hope for the best
- OR -
do I just switch the green on the board to the C and use the green (blue) at the thermostat as the C. Apparently this means I lose control of the fan (auto/On). I am currently running the fan On all the time.
I tried to upload pics but they are too 'big'
Normal setup is one wire from furnace to outdoor condenser (two wires for dumb a/c, many more for smart a/c and/or heatpump). Another wire from furnace to thermostat.
Your Y from furnace to yellow is probably the wire heading out to your condensor. Y is used to turn it on. Blue is probably the ground/return for that circuit.
Four wires to four is probably heading to your thermostat.
If you can run another five wire, do that. That gives you nine. Much of the value in the smart thermostats is being able to control staging/fan speeds/humidifiers etc that each require one or more wires. For my smart thermostat, I ran 2x7. I need 7 now but want to add heatpump which will require at least two more wires and potentially even more depending on how fancy it is.
You could run a single C-line. I wouldn't. Most of the effort is in the snake, might as well run a bunch of wires at the same time.
You could use the adaptor and hope for the best. Worst case, you need to pull off the thermostat every month or so and charge it via usb.
You could probably repurpose G (fan) to C. Most furnaces will automatically run the fan if you call for heat/cool but not all (could wire that downstairs though if required). I want control of G so I wouldn't do this. If you still want the fan to run all the time, easy enough to do that in furnace wiring, it doesn't need to come up to thermostat.


