Enough of COVID...what are you doing to the house?

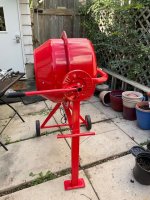
Plus I get a shiny red concrete mixer out of it and I’ve already decided on another project. I have this crappy uneven paver patio outside our back room. There’s maybe 22 2x2 pavers on it and it’s always bugged me. I know there’s compacted crushed stone underneath them already so I figured I would advertise them on Kijiji free to anyone that wants to pick the pavers up (and remove them) then get some terracotta concrete pigment and pour myself a nice level patio. Just need to see what expansion joints to do and whether I should pattern the surface to make it look less like one big slab. Then, depending on how much that makes me swear I have an uneven paved passageway from the front to the back yard that could do with the same treatment. Walk before I can run though….pour the sonotubes first.
Be sure to slope the new patio away from the house a tad.
½" expansion joint against the house will work fine.
 
Plus I get a shiny red concrete mixer out of it and I’ve already decided on another project. I have this crappy uneven paver patio outside our back room. There’s maybe 22 2x2 pavers on it and it’s always bugged me. I know there’s compacted crushed stone underneath them already so I figured I would advertise them on Kijiji free to anyone that wants to pick the pavers up (and remove them) then get some terracotta concrete pigment and pour myself a nice level patio. Just need to see what expansion joints to do and whether I should pattern the surface to make it look less like one big slab. Then, depending on how much that makes me swear I have an uneven paved passageway from the front to the back yard that could do with the same treatment. Walk before I can run though….pour the sonotubes first.
If this is the beginning of your concrete journey, try to minimize water. Most people mix concrete far to wet. Dryish and a thorough rodding with a piece of rebar will be much stronger.
 
******* hell…finished in the dark. Cleaning up the mixer took a while. Hope the concrete is all mixed ok. Most lots seemed pretty good, came out quite thick, a bit of working gave a smooth surface. One lot seemed like a lot of aggregate and wouldn’t smooth easily but didn’t seem overly dry. Stuck a stick in and wriggled it about before putting the saddle brackets in. Hope that gets rid of the air bubbles ok, didn’t seem like it was doing much. All sonotubes covered now and I can leave them for a week before I need to do any framing. That should cure fine right?
 
******* hell…finished in the dark. Cleaning up the mixer took a while. Hope the concrete is all mixed ok. Most lots seemed pretty good, came out quite thick, a bit of working gave a smooth surface. One lot seemed like a lot of aggregate and wouldn’t smooth easily but didn’t seem overly dry. Stuck a stick in and wriggled it about before putting the saddle brackets in. Hope that gets rid of the air bubbles ok, didn’t seem like it was doing much. All sonotubes covered now and I can leave them for a week before I need to do any framing. That should cure fine right?
A week in sonotubes is great. Lots of people pull the wrap off the same or next day, and that stops the curing and no more strength is built. On my deck, I just left the wrap on. it is weathering a bit but not really seen when on the deck so I don't care.
 
A week in sonotubes is great. Lots of people pull the wrap off the same or next day, and that stops the curing and no more strength is built. On my deck, I just left the wrap on. it is weathering a bit but not really seen when on the deck so I don't care.
I'm leaving them on, they will be under the shed deck and they are mostly buried anyway so I don't care. Made a mess of the garden cleaning out the mixer, didn't realise there were some pretty big clumps of crap still in there and now that's spread over part of the lawn. Tried to scrape up most of it and I hope the rain today will do the rest. The sonotubes and holes are covered with black garbage bags so they should stay dryish.
 
A week in sonotubes is great. Lots of people pull the wrap off the same or next day, and that stops the curing and no more strength is built. On my deck, I just left the wrap on. it is weathering a bit but not really seen when on the deck so I don't care.
I thought the wrap has to be left in place forever with sonotubes?

How do you even get it off without digging all around the tube? If I’m missing something place let me know.
 
I thought the wrap has to be left in place forever with sonotubes?

How do you even get it off without digging all around the tube? If I’m missing something place let me know.
Some people peel the visible part. Below ground stays there. I don't normally care and leave it in place. If it really bothered me, some gray paint on the tube is probably faster and easier than peeling it.

Where it extends feet out of the ground, peeling them makes sense for aesthetic reasons.
 
Some people peel the visible part. Below ground stays there. I don't normally care and leave it in place. If it really bothered me, some gray paint on the tube is probably faster and easier than peeling it.

Where it extends feet out of the ground, peeling them makes sense for aesthetic reasons.
Ah gotcha. I just assumed they’re primarily used for the in ground part.

So yes. I can see cutting off that section making sense.

Thanks @Gary and @GreyGhost.
 
Ah gotcha. I just assumed they’re primarily used for the in ground part.

So yes. I can see cutting off that section making sense.

Thanks @Gary and @GreyGhost.

Most of my tube holes aren't completely backfilled yet so I could peel them but I won't. I didn't backfill all the way up as I needed to be able to make small adjustments up until the pour and then they are solid after and I can take my time making things looks good again. Some people paint the concrete pillars that are exposed too.
 
I thought the wrap has to be left in place forever with sonotubes?

How do you even get it off without digging all around the tube? If I’m missing something place let me know.
In actuality, they say you should not bury the tube, but support it with a framework and pour the concrete. Then you remove the wrap and backfill the hole. That's the best way and allows the soil to grip into the concrete, preventing lifting.

The worst thing to do, and most common, is to backfill and pour, then peel to about 6 " below grade level. What happens is as the ground freezes in the fall it expands and grabs the concrete that's been exposed. It lifts a bit as it does it, as the lower part has this nice slippery waxed cardboard tube. A little bit of soil falls in under the edge at the bottom and is compressed in the spring when everything thaws and settles. Over the years this can cause the pile to raise dramatically. It's better to do nothing, than to expose the top buried bit.
For the last deck where I didn't want anything to move, I left the tubes on and backfilled with gravel rodded every few inches. Allows drainage so there should be no freezing and expansion that makes it near the tube. Probably excessive but it worked.
 
I have been welding up the iron fence for the front yard (will post pics once it is in, talked about much earlier in this thread....) so I decided to kill the grass on the street side as this will get tilled and turned into garden.

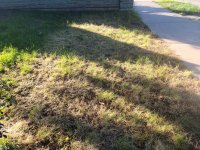
Looked at the Round-up "advanced" which is their now eco friendly solution in the store. It said something like 62g/l acetic acid.... $30 and change for five litres.... Regular white vinegar is 5%, much lower, pickling vinegar is 7% (based on specific gravity it is either 73g/l or 67g/l, too lazy to confirm....) but either way damn close.... it is also only $3.99 for four litres.... So I filled the sprayer with the pickling vinegar, added a couple drops of dish soap to reduce surface tension, sprayed away, two dry days later.....

Now this just burns off the foliage, it does not kill the roots like glyphosate, once they come back a little for $4 more I can just hit it again, I doubt the roots will be up for round three. It makes the dirt slightly acidic but that is not entirely a bad thing depending on what is going in and really after a couple of rain falls....

View attachment 51392
About a week and a half after the first application some green has come back (as expected), I hit it today with another $4 of pickling vinegar, hopefully that finishes the job.

Grass 2.jpg
 
Back
Top Bottom