


You are using an out of date browser. It may not display this or other websites correctly.
You should upgrade or use an alternative browser.
You should upgrade or use an alternative browser.
Rattle can paint for race glass?
- Thread starter FriendlyFoe
- Start date
quikcolin
Well-known member
Awesome job... We are stylin' this year!
LOL, you betcha hahahaha. I'm pretty impressed with the outcome to be honest, this was a fun, cheap way to get slick looking bodywork!
cola_fiend2003
Well-known member
Hey quikcolin. Since it takes several days and coats, did you remove the taping between coats of the yellow? I figure the tape might dry out. Is there a particular type of tape that you used that doesn't dry out? I'm about to start my paint attempt. I've always used automotive paint, but that stuff is expensive and the overspray is rediculous in regards to wastage. This appears to be a better and more economical way. Yours, Dyno's and R1guy's paint looks absolutely fantastic.
quikcolin
Well-known member
Hey quikcolin. Since it takes several days and coats, did you remove the taping between coats of the yellow? I figure the tape might dry out. Is there a particular type of tape that you used that doesn't dry out? I'm about to start my paint attempt. I've always used automotive paint, but that stuff is expensive and the overspray is rediculous in regards to wastage. This appears to be a better and more economical way. Yours, Dyno's and R1guy's paint looks absolutely fantastic.
Thanks very much for the compliment. I tried this paint method out for the same reasons you're looking to do it, I definitly recommend giving it a go!
I just used regular "painters tape". You know the green stuff the you would use to paint on your walls at home... It never dried and worked perfectly. I used the same tape for the entire job, which for my tail section was almost 3 weeks (I dragged my feet on that section lol) and it peeled off at the end like I had just put it on. The paint doesnt get "hard" like an automotive paint, so there is no worry of the paint cracking or breaking off when peeling back the tape.
If u have any other questions, just let us know! Good luck and keep us updated on your progress ;$

cola_fiend2003
Well-known member
So what type of paint brush did you use for the crevices? A foam brush to apply and then rolled it out? or did the paint level out well from the brush? Oh...and how smooth were your parts before painting? Perfect or just 'smooth enough for track bodywork' ?
quikcolin
Well-known member
So what type of paint brush did you use for the crevices? A foam brush to apply and then rolled it out? or did the paint level out well from the brush? Oh...and how smooth were your parts before painting? Perfect or just 'smooth enough for track bodywork' ?
Yep just a foam brush, for the tight areas, then a high density roller for the rest. The paint thins out on its own and any "steaks" or imperfections will smooth right out.
My bodywork was rough, it has dips and valleys, all over it. I just sanded it down enough to create a rough surface for the first coat of paint. Then after that you just lightly wet sand with fine grit sand paper between coats, super fast and easy
")
cola_fiend2003
Well-known member
I started to paint. I may have not thinned the paint out enough.  Seems it is smoothening out but possibly not as much as it should. I'll let the parts I did, dry and sand them down a bit with wet paper (I'm assuming). Tomorrow, I'll go at it again and thin it out more than I did today. And I'll be doing it in the basement from now on. The sun is causing too much dust to get picked up in the sunlight from the garage windows. Doesn't seem to smell that strong. Clean up and mixing in the garage though. Basement carpet needs replacing anyways, but best not to get SWMBO p***** off too much...lmao.
Seems it is smoothening out but possibly not as much as it should. I'll let the parts I did, dry and sand them down a bit with wet paper (I'm assuming). Tomorrow, I'll go at it again and thin it out more than I did today. And I'll be doing it in the basement from now on. The sun is causing too much dust to get picked up in the sunlight from the garage windows. Doesn't seem to smell that strong. Clean up and mixing in the garage though. Basement carpet needs replacing anyways, but best not to get SWMBO p***** off too much...lmao.cola_fiend2003
Well-known member
Is this what the first coat is supposed to look like? like crap? The bodywork is black by nature of the material btw. I'm scared.....:confused1: I get a lot of little bubbles when rolling the paint on... They disappeared shortly afterwards though. I am using high density little rollers from CT. I used mineral spirits too like the instructions on that other link say. I'm scared...
Last edited:
R1Guy
Well-known member
Don't be too concerned with the first coat but it looks a little too runny. I would do a sanding that smooths out all the bumps made from the runs in the paint and try painting again inside the house without thinning the paint as much. The bubbles could be from shaking the paint when mixing?? Tremclad has to be stirred or air bubbles end up in the paint.
cola_fiend2003
Well-known member
Thanks. That red lower is my second attempt. The sides and tail are white and they aren't as runny as that. So I guess it's my thinning. I thinned the red out more than the white so I seem to know now the happy medium in between. Won't touch the uppers until I get this figured out. Looking at the lower, the runs are quite visible, but not on an angle in a reflection, so not much sanding will be needed. The pic looks brutal since its a 2D visualization and we know what a run normally looks like in 3D. But since the paint levelled quite a bit, it's just a cosmetic thing on this coat.
cola_fiend2003
Well-known member
Subsequent coat went on a lot better. I'm sticking with working on the white parts for now for simple convenience and of turning my red to pink and white to off white...The lower sanded down and the runs as I said weren't physical, just visible. That'll wait. the tail and uper and sides are looking good. Didn't try to get the body perfect as it was really beat up and I just repaired breaks and major areas that were basically missing. Still looks good though. Smooth. I'm gonna limit sanding to every second coat. There are so many edges and curves to an R6 body, the edges are getting thin when I sand.I used 400 wet to do the first sand. For the next sand, I should go to 600 for the next 2 sands and 1000 for the final? 5 coats total. Original, two today, and possibly a final single coat. It's hard to get the paint on thinly on this body with a brush due to so many curves and crevices. But in the end it should be good to go. Just not perfect. I will have to get the tank painted but I'm dreading that. Probably just drop it off at an autobody or get hold of one of the painters on the site. No incentive to do it.
Last edited:
Metastable
Well-known member
Cola - you should have just experimented on my bike, since it's ugly as hell already. 
R1Guy
Well-known member
Subsequent coat went on a lot better. I'm sticking with working on the white parts for now for simple convenience and of turning my red to pink and white to off white...The lower sanded down and the runs as I said weren't physical, just visible. That'll wait. the tail and uper and sides are looking good. Didn't try to get the body perfect as it was really beat up and I just repaired breaks and major areas that were basically missing. Still looks good though. Smooth. I'm gonna limit sanding to every second coat. There are so many edges and curves to an R6 body, the edges are getting thin when I sand.I used 400 wet to do the first sand. For the next sand, I should go to 600 for the next 2 sands and 1000 for the final? 5 coats total. Original, two today, and possibly a final single coat. It's hard to get the paint on thinly on this body with a brush due to so many curves and crevices. But in the end it should be good to go. Just not perfect. I will have to get the tank painted but I'm dreading that. Probably just drop it off at an autobody or get hold of one of the painters on the site. No incentive to do it.
I sanded every coat but the first couple were very fine just enough to flatten things out. I started heavier than 400 grit, I think it was 250 but very light... then moved on to 600 and 800. Whatever works thou...
cola_fiend2003
Well-known member
lol at meta. You can take a look at my finished project and decide then......
Sent from my HTC Desire using Tapatalk
Sent from my HTC Desire using Tapatalk
cola_fiend2003
Well-known member
Nearly done. Just need to order numbers, finish attaching foam for seat, mount tail (which was in bad shape so I will probably buy a complete new tail section. One that uses the stock seat. Easier access to battery and fuses, etc). Paint turned out ....OK for what it's used for. I didn't fill in all the chips and gouges. Found the right mix for thinner too. Then I just got lazy with the sanding of the lowers. Still looks OK. Regardless, saved a whack of cash not buying the 2 stage stuff and cleaner. Not to mention trying to paint in a dusty garage. My respiratory system thanks me too.
http://s855.photobucket.com/albums/ab120/cola_fiend2003/New bodywork Project/

Still looks OK. Regardless, saved a whack of cash not buying the 2 stage stuff and cleaner. Not to mention trying to paint in a dusty garage. My respiratory system thanks me too.http://s855.photobucket.com/albums/ab120/cola_fiend2003/New bodywork Project/
Last edited:
Metastable
Well-known member
That "Catch me if you can" sticker would look good on that white section.
cola_fiend2003
Well-known member
:lmao::lmao::lmao::lmao: There are 2 in the garage from Jennings....
That "Catch me if you can" sticker would look good on that white section.
cola_fiend2003
Well-known member
Done except for numbers and the stickers to make me go fast. Still need to paint the gas tank and it's plastic panels in front and on the side. In time.....
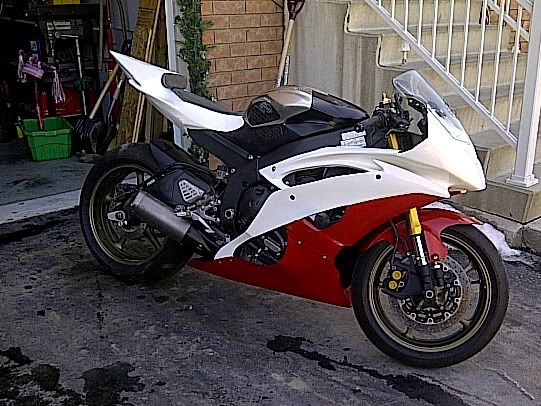
cola_fiend2003
Well-known member
Something like this is what I was aiming for. Sorta


