How do I fix a damaged pannier? | GTAMotorcycle.com

How do I fix a damaged pannier?

TikiTom

Active member
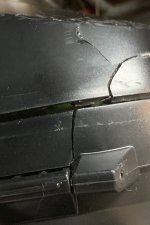
I’ve damaged a Ducati [Givi made] pannier.
:evil:
The type of black plastic used doesn’t seem to repair with the types of epoxies [LePage], super glues [Krazy and Gorilla brands] and polyurethane glues [LePage] I’ve tried/tested. Even Permatex Plastic Welder doesn’t seem to have a great bond.
I think it needs something that will melt the plastic a bit to weld the pieces together. Does anyone have experience or know of something that will definitely work?
Tips or leads are very welcome.
Thanks, Tom
 

Attachments

  • right pannier #1.jpg
    right pannier #1.jpg
    1.2 MB · Views: 41
We use a 3M 2-part epoxy at work that sticks to pretty much everything. Only downside is the price. To get just less than quarts of it, which I think is the only size it comes in, it costs about $250-$300.
 
Lepage isn't exactly well known for epoxies. If it came out of one of those 2 barrel syringes, then you could do better. Consider West System epoxy with a high strength filler mixed in

Sent from my Redmi 7A using Tapatalk
 
Although I don't love the technique in the video below, it might be a consideration. My first option would be to replace the pannier but that is expensive unless you can find one online used. Found these on Facebook Market place.

Flaming the surface of plastic with an open flame also promotes surface bond of polypropylenes but your bags are probably a glass filled nylon. You don't want to melt the surface just use an open flame over it. Good luck!

Alternatively, you can drill holes along the crack and zip tip the plastic bits back together then fiberglass or duct tape over.

 
Look for some letters molded in to let you know what type of plastic you are working with (PP, ABS, etc). Given the extent of the damage, I have little faith in adhesive repairs. For past saddlebags, I have bent up pieces of aluminum diamond plate and riveted them in position. They spread the forces the next time the bag gets pranged and I've never had to redo one.
 
Zero idea if it will work, but I have always had luck with JB Weld and plastic
 
Your cases are likely ABS, good news is they are easy to fix. I’ve done lots of fairing and box repairs - I should YouTube one. Here’s a step by step repair.

1. Drill a 1/8” hole at the end of each crack. This will stop the crack from running.
2. clean the inside surface and crack thoroughly with acetone.
3. make a repair slurry by dissolving scrap abs in acetone. Use a pint mason jar, 1/4 filled with acetone then add abs. You can use abs drain pipe, or for colour use LEGO blocks in as close to the colour as possible. It takes 24 hours to make the slurry, it should be a viscosity between liquid honey and peanut butter.
4. Do each crack separately, the material sets up fast. Spread the crack slightly with a flat blade screw driver. Using a cotton ball, dab acetone into the crack to prime it for repair, also wipe the backside about 1” each side. Repeat 3 times, make sure the acetone hits both mating surfaces. Be generous and fast.
5. using a popsicle stick, press the slurry into the crack from the back side, a small even bead should squish thru to the good side. Remove the screwdriver that held the crack open. You might have to clamp the crack if it doesn’t align itself. You have 2 minutes to complete this step.
6. Using your popsicle stick, feather a patch on the back side 1” wide and at least 1/16” thick.
6b. If the crack is really big, make a back patch from 1/8” abs (Amazon). Cut the patch to size, about 1” wide, then soak the patch for 30 min in acetone to soften it, then press over the crack.
7. A small bead of abs should be on the finished side, use a small exacting to trim it off before it hardens.

Repeat for the next crack.


Voila! Done
 
We use a 3M 2-part epoxy at work that sticks to pretty much everything. Only downside is the price. To get just less than quarts of it, which I think is the only size it comes in, it costs about $250-$300.
Thank Katatonic. I'll look around and maybe ask a body shop about this.
 
Lepage isn't exactly well known for epoxies. If it came out of one of those 2 barrel syringes, then you could do better. Consider West System epoxy with a high strength filler mixed in

Sent from my Redmi 7A using Tapatalk
Hey Jeff. I haven't heard of West Systems yet, but I'll take a look for it. Thanks for helping. BTW The LePages and Pematex epoxies I've tried are the 2 barrel syringe type.
 
Hey Jeff. I haven't heard of West Systems yet, but I'll take a look for it. Thanks for helping. BTW The LePages and Pematex epoxies I've tried are the 2 barrel syringe type.
The abs repair method that Madmike described sounds like it would work well. If you go the epoxy route, call Composites Canada, or Noah's Marine. They can give you some good product recommendations

Sent from my Redmi 7A using Tapatalk
 
Although I don't love the technique in the video below, it might be a consideration. My first option would be to replace the pannier but that is expensive unless you can find one online used. Found these on Facebook Market place.

Flaming the surface of plastic with an open flame also promotes surface bond of polypropylenes but your bags are probably a glass filled nylon. You don't want to melt the surface just use an open flame over it. Good luck!

Alternatively, you can drill holes along the crack and zip tip the plastic bits back together then fiberglass or duct tape over.

I'll check out the FB market and the YT video. The main body plastic doesn't seem to have fibreglass in it. But it's thick, so the welding things might work. Thanks JZ67
 
Hey Jeff. I haven't heard of West Systems yet, but I'll take a look for it. Thanks for helping. BTW The LePages and Pematex epoxies I've tried are the 2 barrel syringe type.
Boat places are a good source of west system components.

For your particular repair, I like mike's approach as it can remelt the plastic into one piece instead of cracked pieces, joints and filler. I use to do something similar with Methyl Methacrylate and ABS. It would soften the base plastic and once the MMA flashed off the joint would be as good as the base. Buying MMA is much harder than buying Acetone so I would use Mikes guide..
 
Look for some letters molded in to let you know what type of plastic you are working with (PP, ABS, etc). Given the extent of the damage, I have little faith in adhesive repairs. For past saddlebags, I have bent up pieces of aluminum diamond plate and riveted them in position. They spread the forces the next time the bag gets pranged and I've never had to redo one.
I like the idea of riveting metal in the pannier, to distribute the repair and any future impacts. If I find a suitable epoxy, I suspect adding that would really strengthen repair. Thanks GG.
 
Zero idea if it will work, but I have always had luck with JB Weld and plastic
I've JB weld on my list of things to check out. Maybe they have a different formula that will work. Too bad the bags don't indicate the type of plastic. Not even a manufacturing date stamp - unless they are hidden between the layers. Thanks regder
 
Your cases are likely ABS, good news is they are easy to fix. I’ve done lots of fairing and box repairs - I should YouTube one. Here’s a step by step repair.

1. Drill a 1/8” hole at the end of each crack. This will stop the crack from running.
2. clean the inside surface and crack thoroughly with acetone.
3. make a repair slurry by dissolving scrap abs in acetone. Use a pint mason jar, 1/4 filled with acetone then add abs. You can use abs drain pipe, or for colour use LEGO blocks in as close to the colour as possible. It takes 24 hours to make the slurry, it should be a viscosity between liquid honey and peanut butter.
4. Do each crack separately, the material sets up fast. Spread the crack slightly with a flat blade screw driver. Using a cotton ball, dab acetone into the crack to prime it for repair, also wipe the backside about 1” each side. Repeat 3 times, make sure the acetone hits both mating surfaces. Be generous and fast.
5. using a popsicle stick, press the slurry into the crack from the back side, a small even bead should squish thru to the good side. Remove the screwdriver that held the crack open. You might have to clamp the crack if it doesn’t align itself. You have 2 minutes to complete this step.
6. Using your popsicle stick, feather a patch on the back side 1” wide and at least 1/16” thick.
6b. If the crack is really big, make a back patch from 1/8” abs (Amazon). Cut the patch to size, about 1” wide, then soak the patch for 30 min in acetone to soften it, then press over the crack.
7. A small bead of abs should be on the finished side, use a small exacting to trim it off before it hardens.

Repeat for the next crack.


Voila! Done
This sounds like an amazing process MadMike. I'll give this a try. But first, it gave me an idea to try abs pluming glue. That stuff welds pieces of abs plastic permanently, and I have some. I'll let everyone know how it goes. Thanks for this MadMike!
 
This sounds like an amazing process MadMike. I'll give this a try. But first, it gave me an idea to try abs pluming glue. That stuff welds pieces of abs plastic permanently, and I have some. I'll let everyone know how it goes. Thanks for this MadMike!
ABS plumbing cement expects a huge contact area (many square inches) and very very little flexion. I'm not sure how well it will hold up with 10ths of a square inch area and lots of bending.
 
This sounds like an amazing process MadMike. I'll give this a try. But first, it gave me an idea to try abs pluming glue. That stuff welds pieces of abs plastic permanently, and I have some. I'll let everyone know how it goes. Thanks for this MadMike!
Won’t work. Abs glue is designed to weld large surface areas, it’s too brittle to glue abs cracks.
 
Have you tried Plastex? I've used it to replace broken tabs on my fairings before.

You used to be able to get it from Home Hardware years ago.

Whatever you're using, make sure you're wearing the proper goggles, gloves and mask for it.
 
Plastic is just crazy glue and baking soda. It will make a cosmetic fix, might work on areas with no stress, I wouldn’t trust it on a pannier repair as it has no elastic strength.
 

Back
Top Bottom