Exchanging the spring plate

karentsang

Well-known member
Site Supporter
Looking for some guidance on removing the rear spring and exchanging the spring plate. In order to lower the bike, I got a "kit" (to my surprise the one spring plate - no other parts like triangles and dogbones?) from Powerbronze, and I'm not sure the instructions are sufficient to a novice like me. The instructions read:

"Jack up the motorcycle so that the rear wheel can be rotated freely. Next gently support the rear wheel of the swing arm so that the spring strut is not loaded. Dismantle the spring strut and exchange the spring plate. Provide the fixing bolts with threadlock. Load the rear wheel before tightening.... ... "

1) Are my swingarm stands sufficient in supporting the bike while I remove the spring? I wasn't sure why the guy in this video (https://www.youtube.com/watch?v=CrgYos29ZXs) says weight needs to be off the rear wheel AND the swingarms.

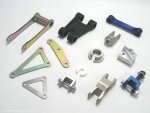
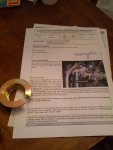
2) Can someone please explain to me how on earth just exchanging this part will help with lowering/balancing the bike when I've already raised my front triple tree fork? Am I missing something? I've attached 2 photos - one of the part I received, and the other the parts I THOUGHT I would be receiving. I've tried browsing through forums and moto DIY sites, and I'm not quite getting it...

Thanks!
IMG_20130106_143508.jpgcdocuments-and-settingsianedwardsdesktoplowering-kits60020a1001jpg.JPG
 
First of all, you have neglected to tell us an important piece of information ... Make, model, year!! It makes a difference. Different rear suspensions are assembled differently. What follows are only general principles ... stuff that applies regardless of make, model, year.

You can NOT use swingarm stands to support a motorcycle if you are working on the rear suspension. Reason: The weight of the bike is still being carried by the suspension! It will collapse as soon as you remove the first load-bearing component.

You have to support the rear of the bike off the ground by some other method, so that the weight is not being carried by the suspension. I normally do it with the bike on a front stand (so that it doesn't fall over) and a couple of tie-down straps hanging down from some overhead hooks in my shop ... which I put in specifically for this purpose! There are other ways of doing it, though. You will have to be creative.

What this piece will do, is change the way the spring is attached to the shock, so that the whole assembly will compress further with the weight of the bike plus you on it, thus allowing the rear of the bike to sit lower. What you have done, by sliding forks up in the triple clamps, addressed only the front of the bike. You have to lower the rear and the front by a balanced amount (start with the SAME amount - but be prepared for having to make minor adjustments) for the steering to remain correct. Drastically unbalanced geometry - caused by drastically changing either the front or rear ride height without making a corresponding change in ride height at the other end - WILL cause very unsafe steering and handling characteristics.

What that piece will NOT do, is change the amount of available suspension travel before the shock bottoms out.

And there's one more thing ... presumably the words "Dismantle the spring strut" come straight from the instructions that you got. What those instructions fail to mention, is that "dismantling the spring strut" requires the use of a spring compressor (a special tool) to safely compress the spring and unload the existing spring seat so that it can be removed - normally by allowing a circlip to be removed.

I have a strange, funny feeling that I have long since lost you. Maybe I'm wrong. If I'm right, and that you have no clue of what I am talking about, this installation is something that is best left to someone who has the tools and the experience to do it. That someone is not me; I don't have a spring compressor. Some jobs are not worth buying the tools for - just get someone who has the tools, to do it.
 
Not following this 100% but working on buddies DR650 we didn't need any special tools to remove the spring. Take preload threads to top and pull out spring plate. Pull off spring. Reverse plate to lower. Thats a factory option not found on most bikes. I'm guessing this kit emulates that.
 
True if the shock in question has threaded preload adjustment and the threaded section is long enough to allow the spring to be unloaded before reaching the end of the threads (and the adjuster nuts aren't seized!). That's not a universal truth. The aftermarket shock in my race bike (which has threaded adjustment) requires a spring compressor to disassemble it. Actually, you COULD disassemble it without a spring compressor, but it would send the adjuster nut and the spring flying across the shop (possibly into your face - compressed springs can be VERY dangerous when they let go) and you'll never get it back together again. A lot of OEM shocks don't even have threaded preload adjustments.

I don't want to send the original poster in a direction that could do damage or get hurt. At a minimum, we need to find out what bike this is and what shock is in it.
 
Right. Also thinking that the kit is incomplete as the spring plate alone won't lower the bike. Only move the spring in relation to shock body. The plate would jack up the bump stop only. That would limit travel, needed if lower shock mount or dogbones are used?
 
That this is very likely to be a half-arse way to do this ... seems pretty likely! But without knowledge of MAKE MODEL YEAR, we can't really comment on any alternatives.

Suspension lowering (by more than the amount of ride height adjustment designed in by the original vehicle manufacturer, if so equipped) always has bad side effects. Always. A lowered vehicle can be made to handle acceptably (not well, but acceptably) ... or it can have some pretty dangerous side effects. You have to know what you are doing to minimize the bad side effects. I'm not entirely convinced, in this particular case.
 
I may have sussed this out ... Honda CBR125. That would explain why there is no linkage - because on a CBR125, the shock acts directly on the swingarm. There IS no linkage. And if it's the stock rear shock, you will most certainly require a spring compressor to allow the spring seat to be removed. Stock shock doesn't have threaded preload collar adjustment - in fact, the preload is not adjustable at all.

See this thread http://www.gtamotorcycle.com/vbforu...ing-a-CBR125-Links-provided-opinions-required

Original poster would do well to re-read that thread.
 
Hi Brian, thanks for the detailed response. Indeed it's a 2011 Honda CBR 125, and no you did not lose me at all.

What I'm likely going to do is remove the entire rear spring ala video from the Ducati dude, and take it to a place who will be able to properly "dismantle the spring strut" and replace the spring plate, after which I will re-install back on the bike at home. I've a good idea that doing all this is not going to do much for lowering, but more to balance the front forks which I had raised. I rode it a few times after I raised the forks and the change was noticeable but not alarming; Keeping in mind I'm a novice rider not throwing any crazy turns at high speeds.

Edit: The CBR 125 doesn't have threaded preload adjustors - not surprising since it's a lil cheapie. Seems like spring compressors aren't that expensive nor complicated to use. Looking into doing this totally DIY. If anyone's interested in giving a hand/learning alongside, I'd be happy to share the experience.

First of all, you have neglected to tell us an important piece of information ... Make, model, year!! It makes a difference. Different rear suspensions are assembled differently. What follows are only general principles ... stuff that applies regardless of make, model, year.

You can NOT use swingarm stands to support a motorcycle if you are working on the rear suspension. Reason: The weight of the bike is still being carried by the suspension! It will collapse as soon as you remove the first load-bearing component.

You have to support the rear of the bike off the ground by some other method, so that the weight is not being carried by the suspension. I normally do it with the bike on a front stand (so that it doesn't fall over) and a couple of tie-down straps hanging down from some overhead hooks in my shop ... which I put in specifically for this purpose! There are other ways of doing it, though. You will have to be creative.

What this piece will do, is change the way the spring is attached to the shock, so that the whole assembly will compress further with the weight of the bike plus you on it, thus allowing the rear of the bike to sit lower. What you have done, by sliding forks up in the triple clamps, addressed only the front of the bike. You have to lower the rear and the front by a balanced amount (start with the SAME amount - but be prepared for having to make minor adjustments) for the steering to remain correct. Drastically unbalanced geometry - caused by drastically changing either the front or rear ride height without making a corresponding change in ride height at the other end - WILL cause very unsafe steering and handling characteristics.

What that piece will NOT do, is change the amount of available suspension travel before the shock bottoms out.

And there's one more thing ... presumably the words "Dismantle the spring strut" come straight from the instructions that you got. What those instructions fail to mention, is that "dismantling the spring strut" requires the use of a spring compressor (a special tool) to safely compress the spring and unload the existing spring seat so that it can be removed - normally by allowing a circlip to be removed.

I have a strange, funny feeling that I have long since lost you. Maybe I'm wrong. If I'm right, and that you have no clue of what I am talking about, this installation is something that is best left to someone who has the tools and the experience to do it. That someone is not me; I don't have a spring compressor. Some jobs are not worth buying the tools for - just get someone who has the tools, to do it.
 
Last edited:
Back
Top Bottom